
-
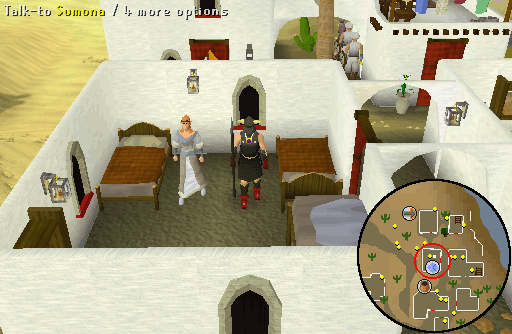
Travel to Pollnivneach and speak to Sumona in the house north of the General Store Stall. She will ask you for help finding her twin sister, who has fallen down a well.
Note: The easiest way to get to Pollnivneach is via a carpet ride from the Shantay Pass to Pollnivneach for a fee of 1000 Coins (Quick travel), or chipping a house tab to the Pollnivneach house portal (requires completion of Love Story.
-
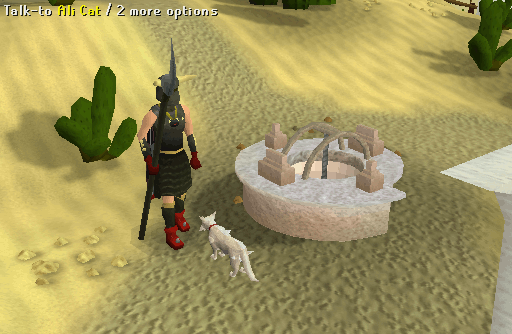
Go to the well in the center of Pollnivneach. Equip your Cat speak amulet or Catspeak amulet(e) and climb down the well. Ali Cat will jump out and stop you. Talk to him to get information about the Mighty banshees, who are at the bottom of the Well, and the Slayer master, Catolax who will teach you how to defeat these Banshees.
-
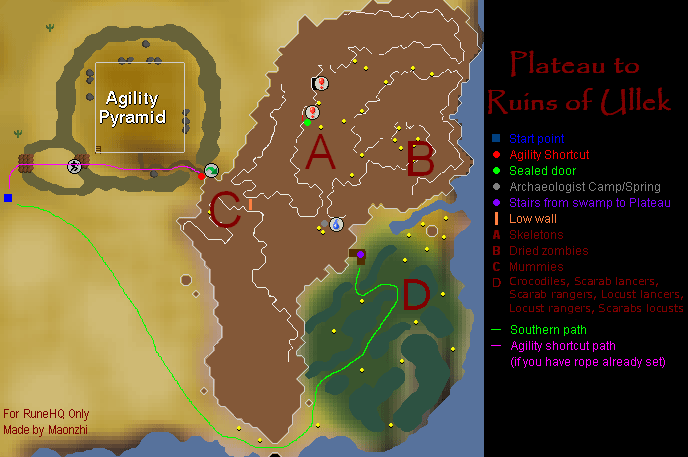
Depending on whether you have/have not completed the Dealing with Scabaras quest, you have two options to reach the Agility Pyramid.
If you have completed Dealing with Scabaras quest and have set the Rope at the shortcut southeast of the Agility Pyramid, then climb down the wall into the agility course and go to the southwestern corner. Climb up the Rope to the top of the plateau. Be prepared for Mummies (level 125) at the top of the plateau that will attack. Run east and climb over the low wall.
If you have not completed Dealing with Scabaras quest, then you will have to follow the path along the southern part of of the agility course and the plateau. Keep moving east until you come to a swampy area. Push through reeds until you get to the stairs that lead to the plateau. Climb over the fallen pillar and go up the stairs. Watch out for Crocodiles (level 89), Scarab lancers (level 112), Scarab rangers (level 103), Locust lancers (level 109), Locust rangers (level 98), and Scabaras locusts (level 106).
Note: The easiest way to reach the area of the Agility Pyramid is via carpet ride from Pollnivneach [1000 Coins (Quick travel)] or a Pharaoh's sceptre teleport to the agility pyramid - the Jaleustrophos teleport.
-
At the top of the Plateau, you will encounter an Archaeologist and his assistant. You can refill your Waterskins at the Spring next to their camp.
Note: If you have not completed Dealing with Scabaras quest, then climb over the low wall to the west and use the Rope on the rock near the edge. Watch out for Mummies (level 125). Doing this will allow you easy access to the plateau in the future. Go back to the Archaeologist's camp.

-
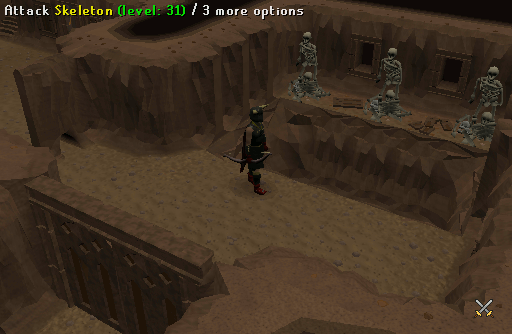
Be careful as the next area has several Skeletons (from levels 97 - 140). Go north to find the Sealed door on the west wall. This will lead you into a cavern with tombs and three corridors.

-
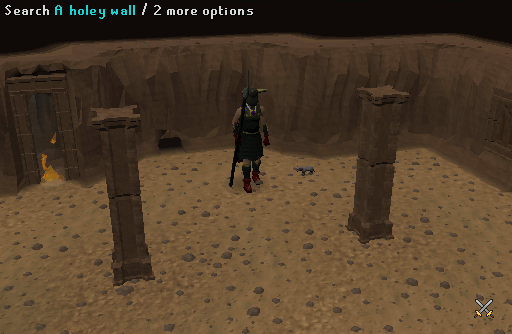
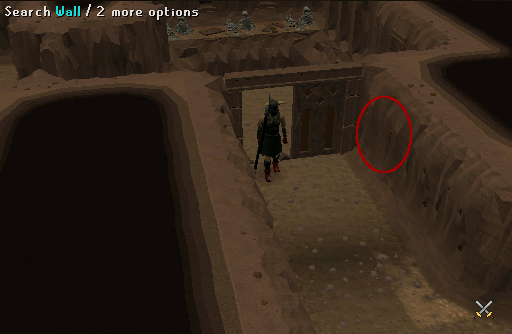
Take out your Pet kitten/cat and equip your Cat speak amulet or Catspeak amulet(e). Search the holey wall and ask your cat to go in the hole. You can start either on the east or west wall. Once your cat or kitten opens the door to one side the other side will be opened as well.
-
Head into the eastern or western room. The western area has Skeletons (level 9) that attack with range. The eastern area has Skeletons (level 12) that attack with magic. Kill the Skeletons with a ranged or magic attack method. Then destroy the door to the north of that room using your pickaxe.
Note: You are not required to kill the skeletons to proceed to the next step. But it is highly recommended to save time and hitpoints.
-
Now, you will need to disarm traps before you proceed down the corridor. Search the wall to disarm the traps. This will only disarm them temporarily, so run quickly down the corridor to the next door.
-
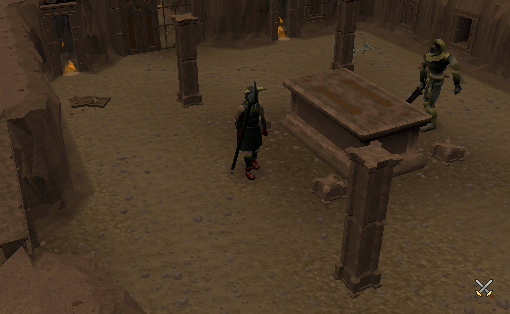
Open the door and enter the next room. You must now defeat four monsters, two skeletons and two zombies. The skeletons and zombies may respawn. You must defeat all of them before the Mummy warrior will be awakened. Kill him to obtain either the Ranged path key (western side) or the Magic path key (eastern side). Use the key on the door east/west of the Mummy warrior's sarcophagus. Pull the lever inside to disarm the traps in that part of the tomb.
Note: You must turn off all prayers or the Mummy warriors will not awaken.
-
After you finish your tasks on one side, you do the same procedure on the other side. You need to pull both levers to disable the traps in the middle corridor. All the traps will now be disarmed.
-
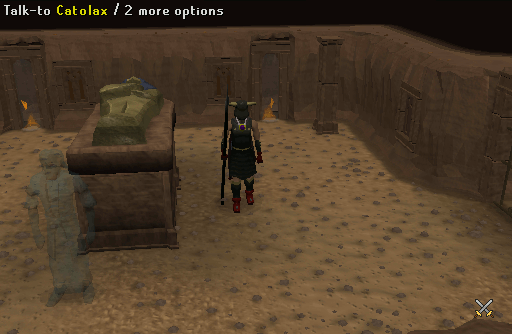
Enter the middle corridor through the first room of the tomb. Equip your Ghostspeak amulet and talk to Catolax to find out how to combine a Facemask and Earmuffs. After the conversation ends, talk to him again to get more information on the area under the well in Pollnivneach.
-
Now, you need to prepare for the final battle. Use Facemask and Earmuffs to create a new slayer item, the Masked earmuffs. Head back to Pollnivneach and go down the well.
Note: The easiest way to get back to Pollnivneach is via Amulet of glory or Ring of duelling teleport to Al Kharid. From there, take a carpet ride from the Shantay Pass to Pollnivneach for a fee of 1000 Coins (Quick travel). If needed, the nearest banks can be found in Al Kharid and Nardah. If you have completed the Contact! quest, then you can also access the bank in Sophanem. You can also use the Al Kharid lodestone or use the broom teleport.
-
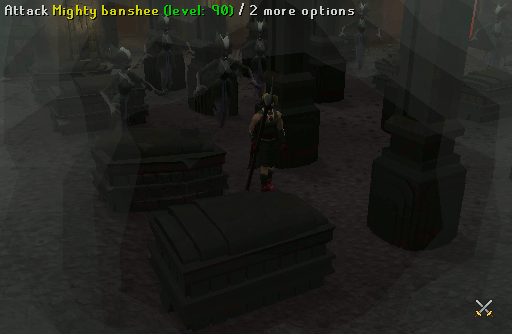
Once you are down in the well, equip the Masked earmuffs and go north to a large cavern filled with Mighty banshees (level 91). Kill one to get the Banshee voice. This will allow you to pass the barrier at the northern end of this cavern.
Note: It is advised to turn on Protect from Melee as their attacks are magic-melee based.
-
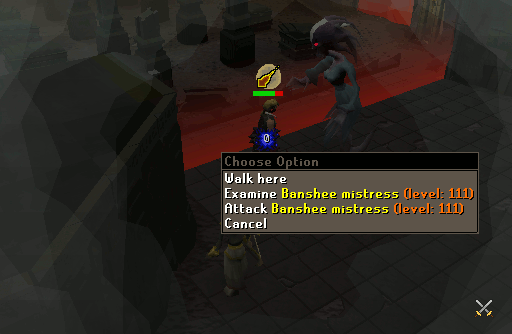
Once you pass the barrier to the north, you will see a cut scene with Jesmona, Sumona's sister. Afterwards, the Banshee mistress (level 93) will attack with magic and melee attacks. Use Protect from Magic while fighting the Banshee mistress. Halfway into the battle, she will call in the help from the Insectoid assassins, who use a ranged attack method. At this point, if you are a low level, or if you have a high magic level or magic defence switch your prayer to Protect from Ranged. If you are a high level leave Protect from Magic on. Keep attacking the Banshee mistress until she is defeated. The Insectoid assassins will be killed by Jesmona once the Banshee mistress is dead.
-
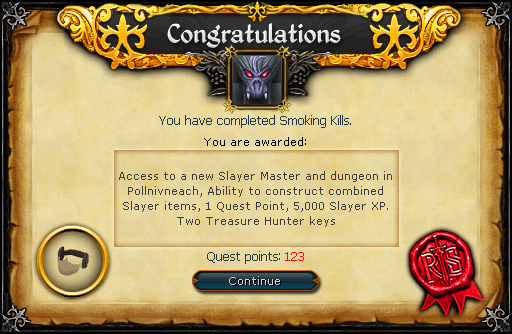
When you have defeated the Banshee mistress another cut scene will occur. Catolax will communicate with you as well. Climb up the bucket rope and go back to Sumona to claim your rewards.
Congratulations! Quest Complete!
Updated Slayer Skill:
After you complete the quest, Sumona is now a new Slayer master. Talk to her to get more information about the new point system. The Underground well area is also a new Slayer Dungeon. After the quest, you can descend down into the well and find Catolax. He will tell you about the underground area. You will also keep the knowledge of creating new slayer items by combining current items together.
- Sumona:
- 35 Slayer required to use her as a slayer master.
- 90 Combat required to use her as a slayer master.
- For more information on her assignments, please refer to the Slayer skill guide.
- Desert Slayer Dungeon:
This dungeon has the following slayer creatures.
- Slayer point system:
- Each assignment you complete for Mazchna, Vannaka, Chaeldar, Sumona, Duradel or Kuradal will give you Slayer points.
- If you have Turael change your task, you will NOT receive points.
- After your fourth task, you will receive points for completed assignments. If you have Turael change your task, this count goes to zero and you will have to do four more tasks before you start accumulating points.
- Each slayer master gives a different number of points: Mazchna - 1, Vannaka - 4, Chaeldar - 10, Sumona - 12, Duradel - 15, and Kuradal - 18.
- You also accumulate points for every 10 and 50 tasks completed.
- Points can be traded for equipment, Slayer experience, or training information.
- For more information on slayer points, please refer to the Slayer skill guide.
This Quest Guide was written by Budmash. Thanks to Arkayla, JasonD, Realruth, x_timowns_x, I_M_Bad13, Sccrluk9, Maonzhi, Emberingphoenix, DrakeArrows, Tinychris1, Im4eversmart, Fruitcheese, YureiTenshi, Mitthy1, Spike31x, HiddenWoody, hiromilover, Alfawarlord, Archaen, KeybladeWars, Applelanche, Muri Master, Hatzopoulos8, Gan, and Rooskii for corrections.
This Quest Guide was entered into the database on Thu, Jun 05, 2008, at 10:43:40 AM by Maonzhi, and it was last updated on Wed, Nov 30, 2016, at 01:27:44 AM by DRAVAN.
If you see this guide on any other site, please report it to us so we can take legal action against anyone found stealing our content. This guide is copyrighted by RuneHQ, and its use on other sites is expressly forbidden. Do not ask if you can use our guides or images, the answer is and always will be NO!
Print this page with images - Back to the Quest Guide Index Page - Back to Top