
Table of Contents
- Agility Courses
- Gnome Stronghold Course
- Burthorpe Agility Course
- Brimhaven Agility Arena
- Werewolf and Skullball Agility Courses
- Anachronia Agility Course
- Agility Pyramid
- Penguin Agility Course
- Barbarian Outpost Agility Course
- Ape Atoll
- Wilderness Agility Course
- Yanille Agility Dungeon
- Bandos' Throne Room Course
- Hefin Agility Course
- Dorgesh-Kaan Agility Course
- Advanced Gnome Stronghold Course
- Advanced Barbarian Outpost Agility Course
- Shortcuts
- Silverhawk Boots
- Capes of Accomplishment
Agility courses are the primary method of training Agility and are basically an obstacle course which you must complete repeatedly in order to gain experience. Initially there is a chance that certain obstacles in many of these courses can be failed, dealing damage to you and causing you to restart or skip part of the course, and for this reason it is recommended to bring food with you when training Agility in order to heal, preferably items that can be eaten in multiple bites such as Cakes.
Agility level:
1 Agility.
Location:
Inside Tree Gnome Stronghold; NorthWest of Ardougne.
Fastest Way to Arrive: If you have completed Tree Gnome Village, then you are able to use the spirit tress to teleport directly to the Stronghold.
Notes:
This course runs in a square (see the map below) so it is advised to to start at the beginning (log balance) and travel counter-clockwise. The obstacles on this course also cannot be failed.
Course Map:

Experience Table:
| Obstacle | Experience Gained |
| Log balance | 7.5 |
| Obstacle net | 7.5 |
| Tree branch | 5 |
| Balancing rope | 7.5 |
| Tree branch | 5 |
| Obstacle net | 7.5 |
| Obstacle pipe | 7.5 |
| Completed Course | 86.5 |
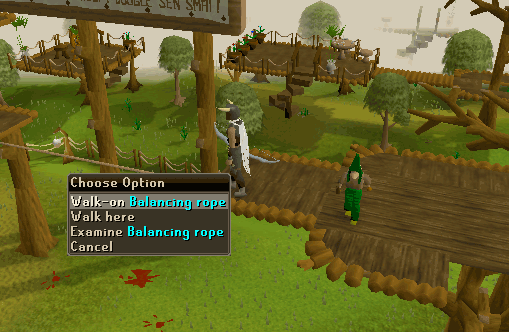
Agility Level:
1 Agility
Location:
In the northern part of Burthorpe, just East of the Games Room.
Fastest Way to Arrive:
Cast the Burthorpe home teleport and run a bit North-East.
Course Map:
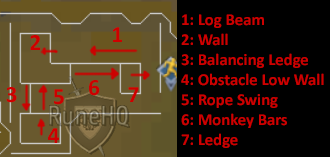
| Obstacle | Experience Gained |
| Log beam | 5.5 |
| Wall | 5.5 |
| Balancing ledge | 5.5 |
| Obstacle low wall | 5.5 |
| Rope swing | 5.5 |
| Monkey bars | 5.5 |
| Ledge | 46.5 |
| Completed Course | 79.5 |
Agility level:
1 Agility, although 40 Agility is recommended to complete all the obstacles.
Location:
In the east of Brimhaven.
Fastest Way to Arrive:
Teleport to Musa Point using an Amulet of glory and walk West.
Notes:
Speak to Cap'n Izzy No-Beared to gain admission, which will cost 200gp if you have not completed the Rocking Out quest.
The object of the activity is to tag the pillars located in the arena in order to get tickets. The arena is made of twenty-five platforms arranged in a 5x5 square, each with a single pillar except for one, which has the exit. Follow the flashing red arrow to find out which pillar you need to tag. Each time you tag an active pillar, you will gain a ticket, which can be used to purchase rewards later.
Between each pair of platforms is an obstacle which must be overcome. If you fail an obstacle, you will take damage. It is recommended to bring light or weight reducing equipment and lots of food, as failed obstacles will reduce your lifepoints by 20-60.
Course Map:
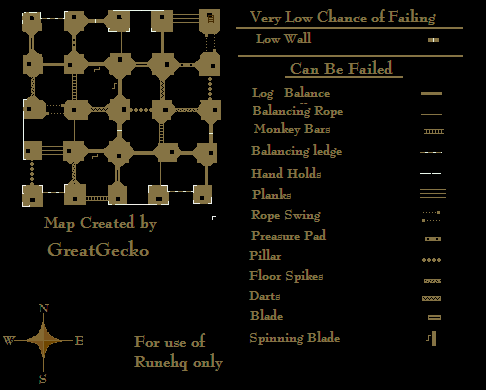
Experience Table:
| Object | Agility Level Required | Experience without gloves* |
Experience with gloves* |
Failable? |
| Blade | 20 | 0 | 0 | Yes |
| Log Balance | 1 | 12 | 13.2 | Yes |
| Pressure Pad | 20 | 26 | 28.5 | Yes |
| Balancing Rope | 1 | 10 | 17.5 | Yes |
| Monkey Bars | 1 | 14 | 15.5 | Yes |
| Rope Swing | 1 | 20 | 22 | Yes |
| Pillar | 1 | 18 | 19.5 | Yes |
| Low Wall | 1 | 8 | 8.5 | Yes |
| Balancing Ledge | 1 | 16 | 17.5 | Yes |
| Floor Spikes | 20 | 24 | 26.5 | Yes |
| Plank | 1 | 6 | 6.5 | Yes, If you walk on wrong plank |
| Hand Holds | 20 | 22 | 24.2 | Yes |
| Spinning Blade | 40 | 28 | 31 | Yes |
| Darts | 40 | 30 | 33 | Yes |
*If you wear Karamja gloves (2) or higher, you can gain an experience boost:
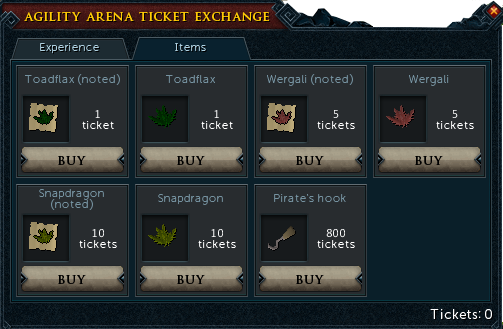
You can buy several items with your Agility tickets, obtained by tagging the active pillars:
Talk to Pirate Jackie the Fruit for your rewards, found outside in the hut.
- One Ticket (1): Small agility lamp
- Ten Tickets (10): Medium agility lamp
- One Hundred Tickets (100): Large agility lamp
- One Thousand Tickets (1000): Huge agility lamp
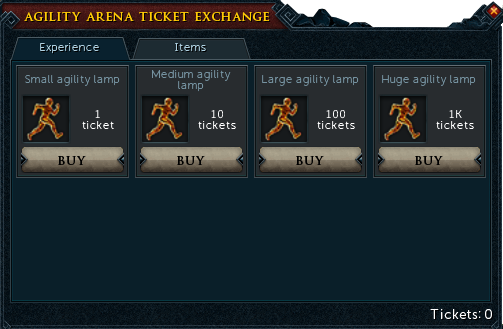
- Clean toadflax (noted): 1 Ticket
- Clean toadflax: 1 Ticket
- Clean wergali (noted): 5 Tickets
- Clean wergali: 5 Tickets
- Clean snapdragon (noted): 10 Tickets
- Clean snapdragon: 10 Tickets
- Pirate's hook: 800 Tickets (The Pirate's Hook is a glove.)
Werewolf and Skullball Courses:
Agility level:
25 Agility (for the Skullball course) and 60 Agility (for the Werewolf course).
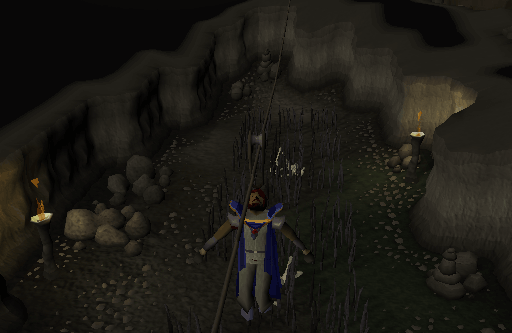
Location:
In the swamps of Morytania.
Fastest Way to Arrive:
Travel to Canifis and follow the North-Eastern path, past the Slayer Master. From there head South/South-East through the swamp until you reach an area with an Agility symbol. Talk to the Agility Trainer (You must be wearing a Ring of Charos) and go down the trapdoor.
Notes:
You must be wearing a Ring of Charos to enter the course. This course runs in a square (see the map below) so it is advised to to start at the beginning (log balance) and travel counter-clockwise. The obstacles on this course cannot be failed, except the zip wire. If you retrieve the stick and bring it back to the Agility Boss at the arena, you will receive bonus experience.
Course Map:
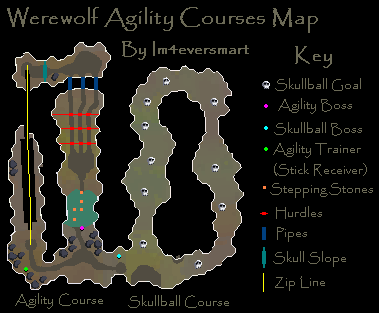
Experience Table:
| Object | Failable? | Experience Gained |
| Stepping Stones | No | 50 (10 per stone) |
| Hurdles | No | 60 (20 per hurdle) |
| Pipe | No | 15 |
| Skull Slope | No | 25 |
| Zip Line | Yes | 200 |
| Retrieving the Stick | N/A | 190 |
| Completed Course | N/A | 350 |
Note: If you fail the zip line, you will lose lifepoints and will not gain the full experience.
Skullball:
Skullball is an Agility minigame. You must kick a skullball through each goal as fast as you can to complete the course. There are 10 goals plus one final goal that you must kick the ball through in order to receive Agility experience. You will gain 750 experience if you can complete the course in 4 minutes or less.
You can perform 3 actions in Skullball - tap, kick and shoot.
If the skullball goes through a goal then its total distance traveled will decrease by one space.
| Action | Spaces Moved |
| Tap | 1 |
| Kick | 4 |
| Shoot | 10 |
Agility level:
30+, varies by section.
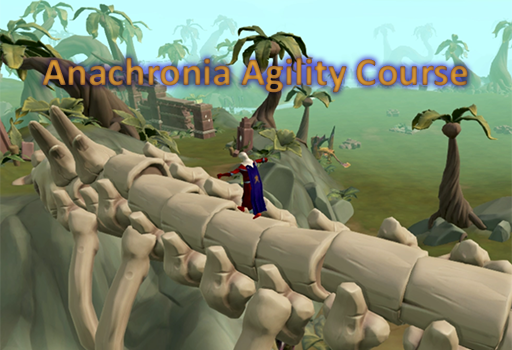
Location:
Anachronia, the land out of time.
Fastest Way to Arrive:
Home teleport to the Anachronia lodestone. If you have yet to build and activate the lodestone, you will need to start by taking the Stormbringer to the island and going through the cutscene/tutorial-esque sequence.
The Anachronia Agility Course covers the entirety of the island, can be done clockwise or counterclockwise, and is the fastest means of travelling from one end to the other. While almost all areas on the island can be accessed without the 85 Agility required to traverse the entire course, it is far more time consuming to cross the island without a high agility level.
The course is broken into 7 different sections, each with its own level requirement. The sections require higher agility levels the farther from the Base Camp you go, from 30 to 85. Despite this, the experience gained for each individual obstacle on the course is always a base of 20, increased further by upgrading the Spa.
Every time a player completes a section of the course, they will receive an amount of bonus experience for the section. They must complete EVERY obstacle in the section, traversing the last obstacle repeatedly in opposite directions will only yield the standard 20. In addition, completing all 7 sections of the course will yield a very sizable chunk of experience and 10 Codex pages.
Several tasks are tied directly to this agility course and to one of the items that can be randomly found while traversing it, which are listed below. The odds of attaining these items can be increased with tier 3 and higher luck enhancements, such as Luck of the dwarves.
| Codex page (1-3) | Compacted leaves | Compacted vines | Dinosaur rib bone | ||||
| Essential oils | Totem of auras base | Totem of crystal top | Totem of summoning top | ||||
| Totem of treasure middle |
The following tables display the sections of the course numbered 1 to 7 in a clockwise direction from the Base Camp. Each table lists the bonus experience for the section and the bonus added to the experience gained by traversing the individual obstacles of the section. It is broken down further to show how these values change with the progress a player has made in upgrading their Spa. Click on the image to enlarge and see what specific obstacles are in store for you--it is easy to accidentally miss an obstacle or two if you don't know it's there thanks to the enormity of the island.
| 30 Agility | ||||||||
| Section 1 | Section 7 | |||||||
| Base | Spa T1 | Spa T2 | Spa T3 | Base | Spa T1 | Spa T2 | Spa T3 | |
| Completion Bonus | ||||||||
| 150 | 157.5 | 160.5 | 165 | 150 | 157.5 | 160.5 | 165 | |
| Total Experience | ||||||||
| 270 | 283.5 | 288.9 | 297 | 310 | 325.5 | 331.7 | 341 | |
 |
 |
|||||||
| 50 Agility | ||||||||
| Section 2 | Section 6 | |||||||
| Base | Spa T1 | Spa T2 | Spa T3 | Base | Spa T1 | Spa T2 | Spa T3 | |
| Completion Bonus | ||||||||
| 400 | 420 | 428 | 440 | 400 | 420 | 428 | 440 | |
| Total Experience | ||||||||
| 560 | 588 | 599.2 | 616 | 520 | 546 | 556.4 | 572 | |
 |
 |
|||||||
| 70 Agility | ||||||||
| Section 3 | Section 5 | |||||||
| Base | Spa T1 | Spa T2 | Spa T3 | Base | Spa T1 | Spa T2 | Spa T3 | |
| Completion Bonus | ||||||||
| 700 | 735 | 749 | 770 | 700 | 735 | 749 | 770 | |
| Total Experience | ||||||||
| 860 | 903 | 920.2 | 946 | 860 | 903 | 920.2 | 946 | |
 |
 |
|||||||
| 85 Agility | ||||||||
| Section 4 | Full Course | |||||||
| Base | Spa T1 | Spa T2 | Spa T3 | Base | Spa T1 | Spa T2 | Spa T3 | |
| Completion Bonus | ||||||||
| 1,000 | 1,050 | 1,070 | 1,100 | 15,500 | 16,275 | 16,585 | 17,050 | |
| Total Experience | ||||||||
| 1,160 | 1,218 | 1,241.2 | 1,276 | 20,040 | 21,042 | 21,442.8 | 22,044 | |
 |
 |
|||||||
Agility level:
30 Agility
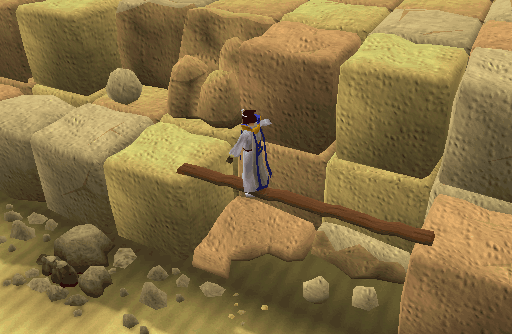
Location:
In the Desert; exit North out of Sophanem and run East until you see the pyramid.
Fastest Way to Arrive:
Use the Jaleustrophos teleport of the Pharaoh's sceptre, use the Camulet teleport and head South-East, or use Desert Amulet 2 to teleport to Nardah and head South-West.
Notes:
Speak to Simon Templeton to begin the course for the first time.
The main goal of the course is to not only complete it, but to reach the top and obtain the Pyramid top, a warning will appear if you try to leave the pyramid without taking the Pyramid top. Turning in the Pyramid top will earn you 200 Menaphos Reputation and 1,000-10,000 Coins from Simon; 10,000 Coins can be earned after completion of the Elite Desert Tasks. Though you can attempt to pass any obstacle backwards, you will always fail and take minimal damage.
When visiting this course, it is important to bring protection from the desert heat: Waterskins (and a Knife), Choc-ices, a Bowl of water (if you have completed Spirits of the Elid), or an Enchanted Water Tiara. Alternatively, after completion of Crocodile Tears you will not need protection from the Desert heat.
In addition to the items above, it is important to bring food (to heal any damage taken) and equip any weight reducing clothes you may have.
Course Map:
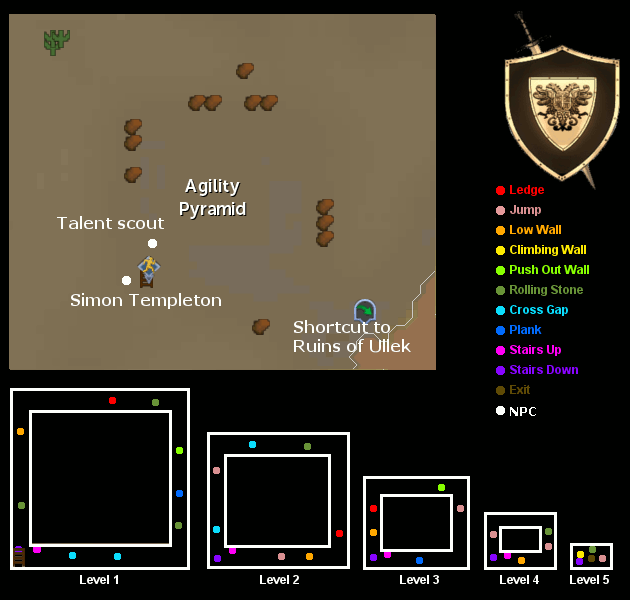
Experience Table:
| Entrance | ||
| Number | Action | Experience Gained |
| Floor 1 | ||
| Number | Obstacle | Experience Gained |
| 1 | Stone Block | 12 |
| 2 | Low Wall | 8 |
| 3 | Ledge | 52 |
| 4 | Plank | 56.4 |
| 5 | Stone Block | 12 |
| 6 | Gap (Sliding) | 57 |
| 7 | Ledge | 52 |
| Floor Total | 249.4 | |
| Floor 2 | ||
| Number | Obstacle | Experience Gained |
| 1 | Gap (Sliding) | 56 |
| 2 | Gap (Jumping) | 22 |
| 3 | Gap (Sliding) | 57 |
| 4 | Stone Block | 12 |
| 5 | Ledge | 56 |
| 6 | Low Wall | 8 |
| 7 | Gap (Jumping) | 22 |
| Floor Total | 233 | |
| Floor 3 | ||
| Number | Obstacle | Experience Gained |
| 1 | Low Wall | 8 |
| 2 | Ledge | 52 |
| 3 | Gap (Jumping) | 22 |
| 4 | Plank | 56.4 |
| Floor Total | 138.4 | |
| Floor 4 | ||
| Number | Obstacle | Experience Gained |
| 1 | Gap (Jumping) | 22 |
| 2 | Low Wall | 8 |
| 3 | Low wall | 12 |
| 4 | Gap (Jumping) | 22 |
| 5 | Low Wall | 8 |
| Floor Total | 72 | |
| Floor 5 | ||
| Number | Obstacle | Experience Gained |
| 1 | Climbing Rocks (Artefact) | 0 |
| 2 | Stone Block | 12 |
| 3 | Gap (Jumping) | 22 |
| Floor Total | 34 | |
| Bonuses | ||
| Obstacle | Experience Gained | |
| Bonus (Exit Stairs) | 500 | |
| Completed Course | 1,214 | |
Agility level:
30 Agility
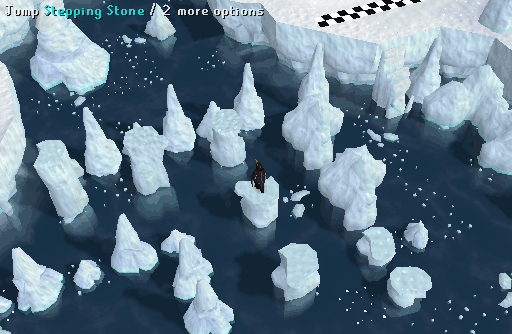
Location:
On the Iceberg, which requires a penguin suit and the completion of the Cold War quest.
Fastest Way to Arrive:
Head to Rellekka and go to the docks. From here, take a boat to the Iceberg and head towards the avalanche in the North-West. To the West is a room; follow the corridor to the Penguin Agility Course.
Notes:
This course offers higher experience than the Barbarian Agility Course but requires a lower agility level. However, on this course, objects can be failed, so it is recommended to bring food. You cannot teleport out in your penguin suit.
Course Map:
Experience Table:
| Obstacle | Experience Gained |
| Platform climb | 55 |
| Complete platform jumps | 80 |
| Icicles (x4) | 40 |
| Ice slope | 180 |
| Agility bonus | 65 |
| Complete Course | 540 |
Barbarian Outpost Agility Course
Agility level:
35 Agility
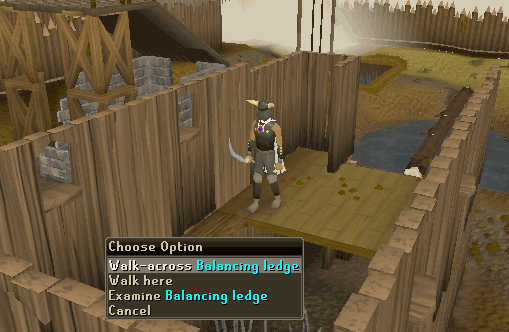
Location:
The Barbarian Outpost, next to Barbarian Assault, requiring the completion of The Alfred Grimhand Bar Crawl.
Fastest Way to Arrive:
Teleport using a Games necklace or walk from Seers' Village.
Notes:
Some objects can be failed, so it is recommended to bring some food.
Course Map:
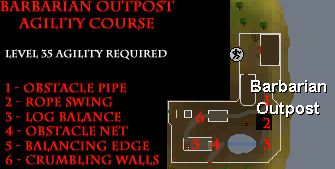
Experience Table:
| Number | Object | Failable? | Experience Gained |
| 1 | Obstacle Pipe | No | 10 |
| 2 | Rope swing | Yes | 22 |
| 3 | Log balance | Yes | 13.7 |
| 4 | Obstacle net | No | 8.2 |
| 5 | Balancing ledge | Yes | 22 |
| 6 | Crumbling wall | No | 13.7 each (41.1 total) |
| Complete Course | 153.2 | ||
Agility level:
48 Agility
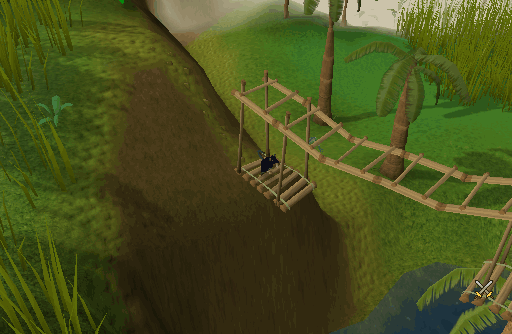
Location:
In Marim, south of Ape Atoll, requiring a Ninja greegree.
Fastest Way to Arrive:
Ape Atoll Teleport or the fairy ring code 'CLR'.
Notes:
The course is very short and rewarding, but all obstacles here can be failed. You will take from 30-70 damage from any failure, so bring some food. It is recommended to have completed the Monkey Madness and Recipe for Disaster quests.
You stop failing this course at 75 Agility.
Course Map:
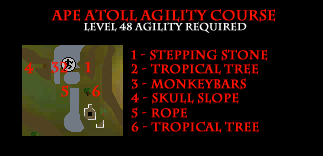
Experience Table:
| Number | Obstacle | Experience Gained |
| 1 | Stepping Stone | 40 |
| 2 | Climbing tree | 40 |
| 3 | Monkey bars | 40 |
| 4 | Skull slope cliff climb | 60 |
| 5 | Rope swing | 100 |
| 6 | Zip vine | 300 |
| Completed Course | 580 | |
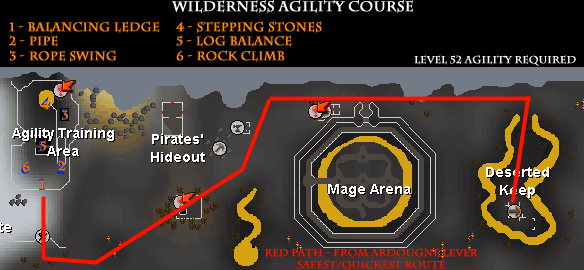
Agility level:
52 Agility
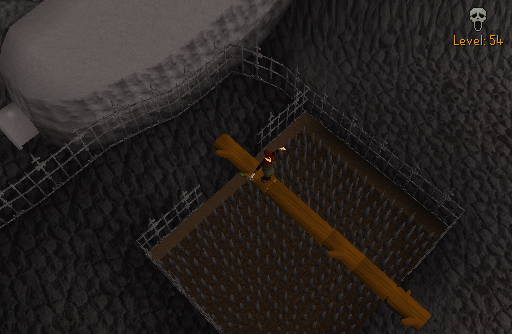
Location:
Level 54 Wilderness
Fastest Way to Arrive:
Use the Lever in East Ardougne and follow the route as shown on the map below.
Notes:
Wearing a Wilderness Sword 2 or higher will grant a 5% bonus to experience gained while skilling at this course. The Wilderness Sword 4 can also be used to teleport to the course free of charge.
Course Map:
Experience Table:
| Number | Object | Failable? | Hitpoints lost if failed | Experience Gained |
| 1 | Pipe | No | N/A | 12.5 |
| 2 | Ropeswing | Yes | 16 to 19% | 20 |
| 3 | Lava Stepping Stones | Yes | 20-22% | 20 |
| 4 | Log balance (Spike Pit Bridge) | Yes | 5 | 20 |
| 5 | Rock Climb | No | N/A | 0 |
| Complete Course | 571.4 | |||
Agility level:
42 Agility, but 67 Agility is recommended to complete every obstacle.
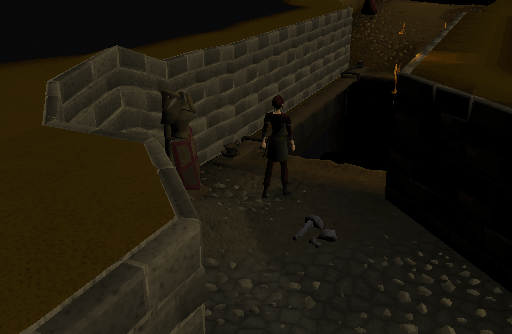
Location:
In the Dungeon underneath Yanille.
Fastest Way to Arrive:
South of the Fight Arena in a house with a spiderweb blocking the door. Cut the spiderweb with a weapon that has a slash attack on it, then go down the stairs to enter the dungeon.
Notes:
Each obstacle requires a different Agility level. Please consult the following table to find out what level you need.
Do not pray at the chaos altar. It will make you fall in a huge pit of level 12 to 64 poisonous spiders.
Course Map:
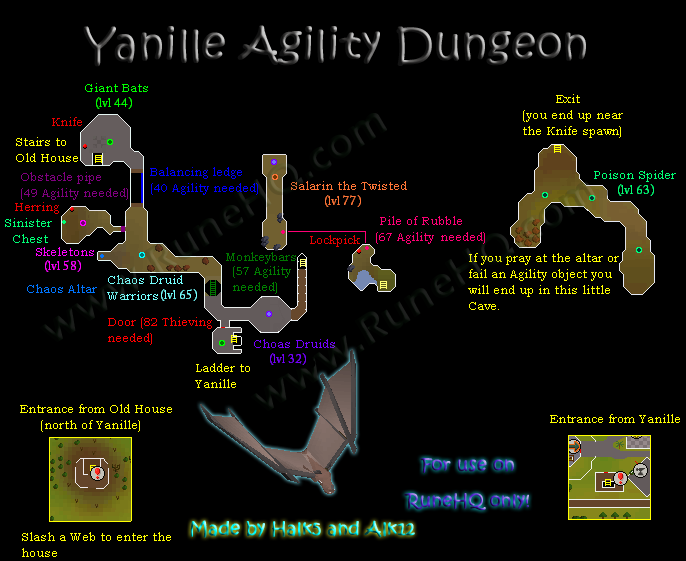
Experience Table:
| Number | Object | Failable? | Agility Level Required | Experience Gained |
| 1 | Balancing ledge | Yes | 40 | 22.5 |
| 2 | Obstacle pipe | No | 49 | 7.5 |
| 3 | Monkeybars | Yes | 57 | 20 |
| 4 | Pile of rubble | Yes | 67 | 5.5 |
| Completed Course | 55.5 | |||
Agility level:
60 Agility
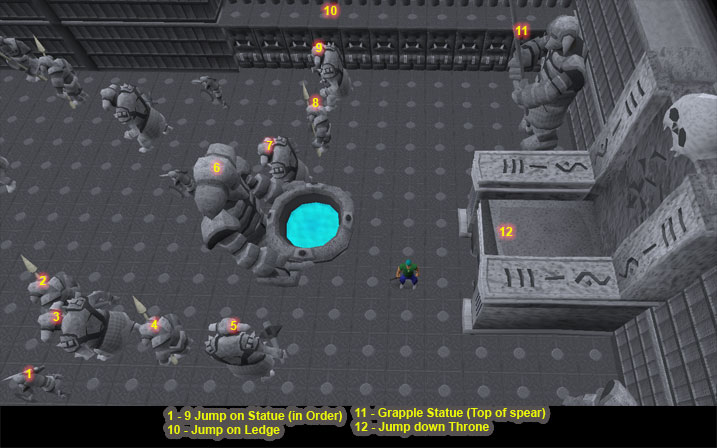
Location:
In Bandos' Throne Room, after the completion of The Chosen Commander quest.
Fastest Way to Arrive:
Use the fairy ring code 'BLQ' to go to Yu'biusk and open the strange box to be teleported into the throne room.
Notes:
You need 60 Agility, Strength and Ranged to enter, as well as a Mith grapple and Crossbow. Ensure you equip the Grappler and crossbow before you jump on the first statue, otherwise you can't change equipment while on the agility course.
It is recommended to take food as a healing method, as you can lose lifepoints.
Experience Table:
| Obstacle | Agility Experience Gained |
| Statue jump (9 times) | 18 (2 per jump) |
| Grapple | 362 (and 125 Ranged and Strength) |
| Completed Course | 380 |
Agility Level Required: 77
Location: Hefin Sector of Prifddinas (requires completion of Plague's End)
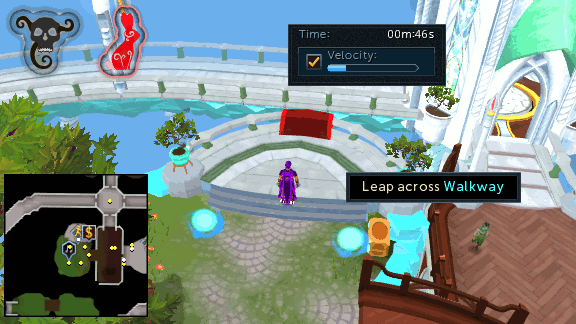
Course Experience:
The Hefin Agility Course differs to all other courses in that the experience for completing the 6 obstacles and full course increases every 5 levels from 77 to 97 and these values are as follows:
| Agility Level | Obstacle Experience | Course Complete Bonus | Total |
| 77-81 | 264 (44 x6) | 440 | 704 |
| 82-86 | 330 (55 x6) | 550 | 880 |
| 87-91 | 396 (66 x6) | 660 | 1056 |
| 92-96 | 444 (74 x6) | 740 | 1184 |
| 97-99 | 498 (83 x6) | 830 | 1328 |
Shortcuts:
After completing a lap, there is a chance that either one or two shortcuts can be accessed on the next lap and these are:
- Window Shorcut: A window opens in the side of the Hefin mountain which can be accessed after completing the "Traverse the cliff" obstacle. Jumping into this window allows you to skip the "Scale cathedral" and "Vault roof" obstacles as it takes you directly to the cathedral roof.
- Light creature: A Light creature appears on the roof of the cathedral and allows you to complete the course without using the "Slide down zip line" obstacle.
Velocity:
The Velocity system is unique to this course and will charge up as you complete obstacles. When the meter is full, you will automatically complete the next obstacle without having to click on it and the meter will reset. This can be toggled on or off at any.
While the Voice of Seren is active in the Hefin Sector of Prifddinas, the following effects apply to the Hefin Agility Course:
- Experience for completing each obstacle and the full course is increased by 20%.
- The Velocity meter will fill in one lap.
- Increased chance of the two shortcuts being accessible.
- A small amount of Prayer experience is awarded upon completion of a full lap.
Rewards:
After completing each lap of the course, there is a chance that the Light creature will reward you with one of the items listed in the table below:
| Hefin Emotes |
| Reward |
 Hefin Bow Hefin Bow |
 Hefin Crane Hefin Crane |
 Hefin Lotus Hefin Lotus |
 Hefin ward Hefin ward |
| Prifddinian Worker's Outfit |
| Reward |
 Prifddinian worker's boots Prifddinian worker's boots |
 Prifddinian worker's gloves Prifddinian worker's gloves |
 Prifddinian worker's robes Prifddinian worker's robes |
 Prifddinian worker's trousers Prifddinian worker's trousers |
| Clan Symbols |
| Reward |
 Amlodd symbol piece Amlodd symbol piece |
 Cadarn symbol piece Cadarn symbol piece |
 Crwys symbol piece Crwys symbol piece |
 Hefin symbol piece Hefin symbol piece |
 Iorwerth symbol piece Iorwerth symbol piece |
 Ithell symbol piece Ithell symbol piece |
 Mielyr symbol piece Mielyr symbol piece |
 Trahaearn symbol piece Trahaearn symbol piece |
| Food |
| Reward |
 Mint cake Mint cake |
 Spicy stew Spicy stew |
 Summer pie Summer pie |
| Miscellaneous |
| Reward |
 Agility potion (3) Agility potion (3) |
 Blissful shadow core Blissful shadow core |
 Corrupted ore Corrupted ore |
 Crystal acorn Crystal acorn |
 Enlightenment scroll Enlightenment scroll |
 Hefin course multiplier Hefin course multiplier |
 Manifest shadow core Manifest shadow core |
 Small experience lamp (Agility) Small experience lamp (Agility) |
 Small experience lamp (Prayer) Small experience lamp (Prayer) |
 Truthful shadow core Truthful shadow core |
 The Voice of the Elders The Voice of the Elders |
*This book is awarded after completing 20 laps with every subsequent 20 laps awarding a new chapter until it is completed after 160 laps.
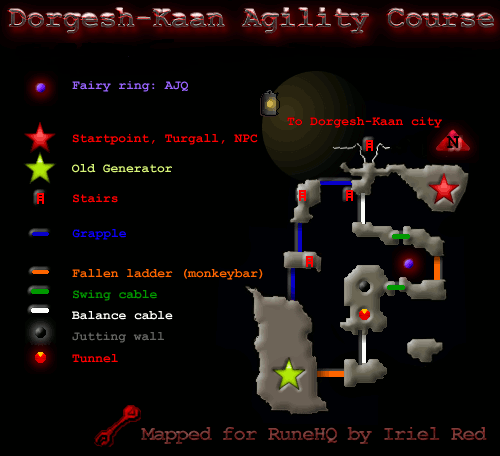
Agility level:
80 Agility
Location:
In Dorgesh-Kaan, after the completion of the Death to the Dorgeshuun quest.
Fastest Way to Arrive:
Use the fairy ring code 'AJQ'.
Notes:
Start by speaking to Turgall in the NorthEastern power station. He'll ask you to fetch an item for him from the old generator, you will choose between a heavy item and a delicate item. The heavy item can not be carried on the grapple route, and the delicate one is too fragile to squeeze through the tunnel.
Course Map:
| Delicate items | |
| Item | Image |
| Capacitor |  |
| Fuse |  |
| Meter |  |
| Heavy items | |
| Item | Image |
| Cog |  |
| Lever |  |
| Powerbox |  |
Turgall will give you a spanner - make sure to have a space in your inventory for this, as well as a space for the part you're picking up. Make your way to the old generator, use the spanner on the console to retrieve a delicate item, or on the boiler to retrieve a heavy item.
You may use one path one way or both back and forth, as long as you have the correct part with you. For pure agility training however, most players take the tunnel path both ways.
When returning to Turgall he'll give you experience bonus according to which path(s) you took; 571 Ranged experience each way for the grapple path, and 1216 Agility each way for the tunnel path. In other words, if you used the tunnel path both ways, you get a 2432 Agility bonus in addition to experience for the obstacles.
Fallen ladders, swing and balance cables, as well as grappling pylons can be failed. If you fall while grappling, use the nearby ladder to climb back up, if you fall using the tunnel path, go to the ladder in the North part of the cave and climb back up.
The item you are carrying will break upon falling, destroy it right away and pick up another one from the old generator. If you leave the course carrying an item, including random events, the item will break as well.
Experience Table:
| Obstacle | Experience Given |
| Grapple pylon | 18 |
| Balance cable | 25 |
| Swing cable | 22 |
| Squeeze past jutting wall | 7.5 |
| Crawl through tunnel | 7.5 |
| Completed Course | 53 (using grapple) or 159 (crawling through tunnel) |
Advanced Gnome Stronghold Course
Agility level:
85 Agility
Location:
Inside Tree Gnome Stronghold; NorthWest of Ardougne.
Fastest Way to Arrive:
If you have completed Tree Gnome Village, then you are able to use the Spirit trees to teleport directly to the Stronghold.
Notes:
The first three obstacles are the same as the basic course. The advanced course is one level higher above the 'Climb Tree branch' spot and continues above the basic course to the same finish area.
You stop failing this course at 89 Agility.
Experience Table:
| Obstacle | Experience Gained |
| Log balance | 7.5 |
| Obstacle net | 7.5 |
| Tree branch | 5 |
| Tree | 25 |
| Signpost | 25 |
| Pole | 25 |
| Barrier | 25 |
| Completed Course | 725 |
Advanced Barbarian Outpost Agility Course
Agility level:
90 Agility
Location:
The Barbarian Outpost, next to Barbarian Assault, requiring the completion of The Alfred Grimhand Bar Crawl.
Fastest Way to Arrive:
Teleport using a Games necklace or walk from Seers' Village.
Notes:
You stop failing this at 93 Agility.
Experience Table:
| Object | Experience Gained |
| Rope swing | 22 |
| Log balance | 13.7 |
| Wall run | 15 |
| Wall climb | 15 |
| Spring device | 15 |
| Balance beam | 15 |
| Gap jump | 15 |
| Roof slide | 15 |
| Complete Course | 740.7 |
As you level up Agility you will gain the ability to use many shortcuts around Gielinor which allow you to access areas faster and easier.
To view all of the available shortcuts, visit our Perks of Agility page.

Silverhawk boots are recharged with Silverhawk feathers or Silverhawk down which when recharged have up to 500 charges. Whilst equipped each charge gives Agility experience equal to 10% of the experience rewarded from a Small experience lamp. They require a minimum of 1 Defence to wear, and can have their stats changed in increments of 10 up to level 60.

Once you have achieved level 99, you may visit Cap'n Izzy No-Beard, at the Brimhaven Agility Arena, to purchase an Agility cape for 99,000 Coins.

Once you have achieved level 120, Cap'n Izzy No-Beard will sell you the Agility Master Cape for 120,000 Coins.
Discount
Note that as of December 2018, another one of Mod Daze's Easter Eggs have been found. This enables you to purchase a Skillcape for half price (only from Cap'n Izzy No-Beard, not Elen) if you are wearing a Ring of Charos (a). Be aware that "Half price" is 92,000 Coins as the experience at level 92 is approximately half way to level 99.
This Skill Guide was written by Greg, Knight, and Rooskii. Thanks to Zaros Ultor, CapuDie, Weezy, Graystar, Elyria1, androidcabel, Greatgecko, Im4eversmart, Shaw, Fireball0236, ABSinclair, uponthesun, Jakesterwars, DRAVAN, davros70, Keystone, DownStrike, Tjaitil, Eq_S_Guy, the_peleton, Aakanaar, Stormer, Dhaphaos, adamb53, Creepy675298, CrazedFred, Oblivion590, assassin the stealth, trekkie, Wikedjuggalo, dovepaw405, QueenSteffie, Kevil6663, Davroz70, andro_girl, martori, Nuke-Marine, xinxan, gkef, axeking187, potato farm, kyse, XZ_Wicked_ZX, orbitoze, The Gracer, knight v3, chocoholic92, gondomwinges, gkef, Varinathras, Kang, Bremen4, Fivestar24, Sir Karamu, Geine1, Hilwin1, Lokthi, Saxrox, spaz_from_gs, Slightshadow, watsermetjou, halk 5, HvBurrito, LogGamer, Alk12, Catherine151, Chaosblade77, Runewar, Senug5, Mythiquedame, Killmouski, bordag, DarkBlitz, Maonzhi, JoeC, Desertdee, Gregmasta, Fox_racer30, Xyoon, Thejester, Dino 4 Jesus, Kopite_91, ketzer, ewolfg1, drugman99, theredraja, ausiey sol, ice_demon_27, slalyer01, 99scimmy99, paladin_mcg, jester_punk, Treilad, danielboy321, ill m4g3 il, Iriel Red, Senug5, Clamball, Amithysia, Riku, Cristiano Ronaldo, Radmite, diamondi3ack, Candeh, Lupin Bruzer Hilwin1, powotae, 3ter 1, earl dumares, Tayke, Javezz, Lisa3712, Dark, Ksb Single, and GeraltRivia2. for corrections.
This Skill Guide was entered into the database on Sat, Feb 12, 2005, at 06:29:54 PM by nitr021, and it was last updated on Sun, Oct 06, 2019, at 06:10:32 PM by 3ter1.
If you see this guide on any other site, please report it to us so we can take legal action against anyone found stealing our content. This guide is copyrighted by RuneHQ, and its use on other sites is expressly forbidden. Do not ask if you can use our guides or images, the answer is and always will be NO!
Print this page with images - Back to the Skill Guide Index Page - Back to Top