
Table of Contents:
- Getting Started
- Important Locations
- Summoning Items
- Summoning Pouches
- Summoning Familiars
- Summoning Scrolls
- Summoning Headgear
- Cockatrice Egg Variations
- Pets
- Dungeoneering Summoning
- How To Train Summoning
- Training Routes
- FAQ
- Temporary level boosts and Quest rewards
- Capes of Accomplishment
Before first training Summoning, it is highly recommended to complete Wolf Whistle as this will award you with enough experience to reach level 4 and give you 275 Gold charms to get started with, as well as teach you the basics of creating pouches.
To make a pouch and start training Summoning, you will need to make sure you have the primary ingredient, which is almost always either a Gold, Green, Crimson, or Blue charm, an empty Pouch, plenty of Spirit shards, and the secondary ingredient item required to make your chosen pouch.
Once you have these 4 items, you'll need to go to one of the obelisks listed here and click on it to bring up this interface:
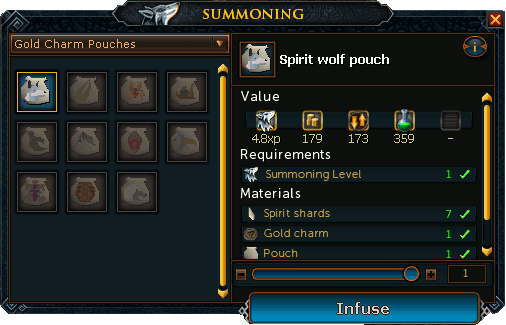
Now find your chosen pouch and click the "Infuse" button to create a pouch and gain experience. Once done, you can then click on your newly created pouch to summon the familiar and gain a little more experience if you wish.
To access your Familiar Options, click on the Summoning icon  on your action bar and the Familiar Options tab shown below will open.
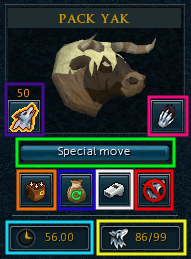
- Green - This shows the amount of special move points the creature can still perform.
- Purple - This shows how many Summoning ability scrolls you have left in your inventory.
- Pink - Clicking this button orders your familiar to attack a target once one is chosen.
- Yellow - This displays how many Summoning points you have left and your Summoning level.
- Aqua - This displays how much time your familiar has left before vanishing.
- Orange - Clicking this button deposits items your familiar is carrying into your inventory.
- White - Clicking this button will call your familiar to you, provided you are in a large enough area for it to fit.
- Blue - Clicking this button will renew familiar's timer before vanishing and will also heal its life points, provided you have another summoning pouch that is the same as your current familiar in your inventory. This can be done any time, as long as the familiar's timer is not at its maximum.
- Red - Clicking this button will dismiss your Summoning familiar.
Summoning a familiar requires and drains a certain number of Summoning points and these will continue to be drained over the period that your familiar remains summoned. This means that to summon another familiar, you will need to renew your Summoning points and this can be done by right-cliking on any obelisk. However, as there are only a small number of these around Gielinor, you can also find many Small obelisks which have the sole purpose of renewing your Summoning points and can't be used to infuse pouches, although they can also be used to access the Familiarisation Distraction and Diversion.
| Obelisks/Shops | ||
| Area | Location | Map |
| Taverley | Pikkupstix's Summoning Shop. |  |
| Gu'Tanoth | Bogrog's Summoning Shop. |  |
| Nature Spirit Grotto | Inside the Nature Spirit Grotto on the south side of Mort Myre (requires completion of Nature Spirit). |  |
| Isafdar | Inside the Isafdar entrance to the Underground Pass (requires partial completion of Regicide). |  |
| Brimhaven | Northwest of Brimhaven. | 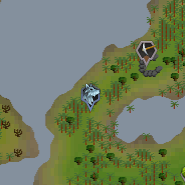 |
| Piscatoris Hunter Area | Inside a cave accessed through a trapdoor found south of the Piscatoris Fishing Colony. | 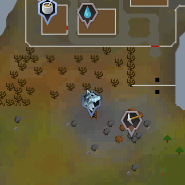 |
| Kharidian Desert | In a cave accessed through a trapdoor found northeast of Sophanem. | 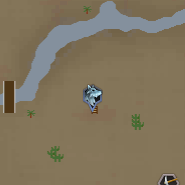 |
| Prifddinas | Amlodd Sector of Prifddinas (requires completion of Plague's End). |  |
| Pet Shops/Incubators | ||
| City Name | Location | Map |
| Taverley | South of the Summoning shop |  |
| Yanille | West of the Wizards' Guild |  |
| Name | Image | Use | Where To Get |
| Pouch |  |
Required for making Summoning pouches | Bought from Pikkupstix or Lord Amlodd for 1gp |
| Spirit shards |  |
Required for making Summoning pouches | Bought from Pikkupstix or Lord Amlodd for 25 gp |
| Gold charm |  |
Required for certain Summoning pouches | Wolf Whistle reward and Monster drop |
| Green charm |  |
Required for certain Summoning pouches | Monster drop |
| Crimson charm |  |
Required for certain Summoning pouches | Monster drop |
| Blue charm |  |
Required for certain Summoning pouches | Monster drop |
| Abyssal charm |  |
Required for all Abyssal familiar pouches | Monster drop |
| Elder charm |  |
Required for Nightmare muspah pouches | Monster drop |
| Obsidian charm |  |
Required for all Obsidian familiar pouches | Monster drop |
| Ravager charm |  |
Required for Void ravager pouches | Bought from the Void Knight's Outpost for 2 commendation points each |
| Shifter charm |  |
Required for Void shifter pouches | Bought from the Void Knight's Outpost for 2 commendation points each |
| Spinner charm |  |
Required for Void spinner pouches | Bought from the Void Knight's Outpost for 2 commendation points each |
| Torcher charm |  |
Required for Void torcher pouches | Bought from the Void Knight's Outpost for 2 commendation points each |
| Talon beast charm |  |
Required for Talon beast pouches | Monster drop |
| Antlers (uncharged/charged) |  |
Worn to increase Summoning defence and hold scrolls for you |
Bought from Pikkupstix or Lord Amlodd for 100gp |
| Lizard skull (uncharged/charged) |  |
Worn to increase Summoning defence and hold scrolls for you |
Bought from Pikkupstix or Lord Amlodd for 200gp |
| Feather headdress |  |
Worn to increase Summoning defence and hold scrolls for you |
Player made |


 Flowers (


| Familiar Name | Level Required | Time Out (Minutes) | Experience per Summon | Skill Focus | Other |
| Spirit wolf | 1 | 6 | 0.1 | Combat - Attack | Fights (Level 26) |
| Dreadfowl | 4 | 4 | 0.1 | Combat - Magic | Fights (Level 26) and Farming boost (1) |
| Spirit spider | 10 | 15 | 0.2 | Forager - Randomly produces a number of Red spiders' eggs | Fights (Level 25 - Controlled) |
| Thorny snail | 13 | 16 | 0.2 | Combat - Ranged | Fights (Level 26) and Beast of Burden (3) |
| Granite crab | 16 | 18 | 0.2 | Forager - Generates fish while owner is Fishing | Fights (Level 26 - Defence) and Fishing boost (1) |
| Spirit mosquito | 17 | 12 | 0.5 | Combat - Attack | Fights (Level 32) |
| Desert wyrm | 18 | 19 | 0.4 | Forager - Right click option to collect ores | Fights (Level 31 - Strength) and Mining boost (1) |
| Spirit scorpion | 19 | 17 | 0.9 | Combat - Controlled | Fights (Level 51) |
| Spirit Tz-Kih | 22 | 18 | 1.1 | Combat - Magic | Fights (Level 36) and Right click option "Despair", which drains your opponent's prayer instead of damaging |
| Albino rat | 23 | 22 | 2.3 | Combat - Attack | Fights (Level 37) and Forager - stores cheese from scroll use |
| Spirit kalphite | 25 | 22 | 2.5 | Beast of Burden - 6 slots | Fights (Level 39 - Defence) |
| Compost mound | 28 | 24 | 0.6 | Forager - Compost and seeds | Fights (Level 27 - Strength), Farming boost (1 + 2% of level), and use a bucket on it to gather compost (deals 20 damage to it) |
| Giant chinchompa | 29 | 31 | 2.9 | Combat - Ranged | Fights (Level 42) and Explode - chance of exploding in combat, inflicting damage to nearby enemies |
| Vampyre bat | 31 | 33 | 1.5 | Combat - Controlled | Fights (Level 44) and possibility of healing itself when inflicted damage is done |
| Honey badger | 32 | 25 | 1.6 | Combat - Strength | Fights (Level 45) and Ferocious - chance of attack twice without a delay |
| Beaver | 33 | 27 | 0.7 | Forager - Logs and planks | Woodcutting boost (2) and Fletcher (acts as a knife) |
| Void ravager | 34 | 27 | 0.7 | Forager - Ores | Fights (Level 46 - Strength) and Mining boost (2) |
| Void spinner | 34 | 27 | 0.7 | Healer - Heals owner for 10 Life Points often | Fights (Level 40 - Defence) |
| Void shifter | 34 | 94 | 0.7 | Combat - Attack | Fights (Level 46) and Teleporter - teleports you to the Void Outpost if you have less than 10% Life Points |
| Void torcher | 34 | 94 | 0.7 | Combat - Magic | Fights (Level 46) and Right click option "Strike", which damages one extra |
| Bronze minotaur | 36 | 30 | 3.6 | Combat - Defence | Fights (Level 50) |
| Bull ant | 40 | 30 | 0.6 | Beast of Burden - 9 slots | Fights (Level 58 - Controlled) |
| Macaw | 41 | 31 | 0.8 | Forager - Herbs | Remote view and improved herb drops |
| Evil turnip | 42 | 30 | 2.1 | Combat - Ranged | Fights (Level 62), Forager - evil turnip slices, and possibility of healing itself when using Ranged attacks |
| Spirit cockatrice, coraxatrice, guthatrice, pengatrice, saratrice, vulatrice, zamatrice | 43 | 36 | 0.9 | Combat - Magic | Fights (Level 64), Right click option "Drain" (inflicts damage and drains a combat stat, varying according to type), and Forager - cockatrice eggs |
| Iron minotaur | 46 | 37 | 4.6 | Combat - Defence | Fights (Level 70) |
| Pyrelord | 46 | 32 | 2.3 | Combat - Strength | Fights (Level 70), Firemaking boost (3), and counts as a tinderbox and a 10 experience bonus |
| Magpie | 47 | 34 | 0.9 | Forager - Jewellery | - |
| Bloated leech | 49 | 34 | 2.4 | Combat - Attack | Fights (Level 76) |
| Spirit terrorbird | 52 | 36 | 0.8 | Beast of Burden - 12 slots | Fights (Level 62 - Controlled) |
| Abyssal parasite | 54 | 30 | 1.1 | Beast of Burden - 7 slots for unnoted rune/pure essence | Fights (Level 86 - Magic) and slowed abyssal Prayer drain |
| Spirit jelly | 55 | 43 | 5.5 | Combat - Strength | Fights (Level 88) |
| Ibis | 56 | 38 | 1.1 | Forager - Gathers fish when owner is Fishing | Fishing boost (3) |
| Steel minotaur | 56 | 46 | 5.6 | Combat - Defence | Fights (Level 90) |
| Spirit graahk | 57 | 49 | 5.7 | Combat - Strength | Fights (Level 93), Hunter boost (5), Trample - attack twice if moving to get into battle, and can teleport you to the Horned graahk Hunter area |
| Spirit kyatt | 57 | 49 | 5.7 | Combat - Attack | Fights (Level 93), Hunter boost (5), Pounce - if called or summoned into combat the first attack can deal up to triple the normal hit, and can teleport you to the Piscatoris Hunter area |
| Spirit larupia | 57 | 49 | 5.7 | Combat - Controlled | Fights (Level 93), Hunter boost (5), and can teleport you to the Feldip Hunter area |
| Karamthulhu overlord | 58 | 44 | 5.8 | Combat - Ranged | Fights (Level 95) and Right click option "Drown" (hits opponent with water spell) |
| Smoke devil | 61 | 48 | 3 | Combat - Magic | Fights (Level 101) and Right click option "Flames" (hits opponent with fire spell) |
| Abyssal lurker | 62 | 41 | 1.2 | Beast of Burden - 12 slots for unnoted rune/pure essence | Fights (Level 93 - Controlled) |
| Spirit cobra | 63 | 56 | 3.1 | Combat - Attack | Fights (Level 105) |
| Stranger plant | 64 | 49 | 3.2 | Combat - Controlled | Fights (Level 107), Farming boost (1 + 4% of level), and Forager - strange fruit |
| Barker toad | 66 | 8 | 1 | Combat - Strength | Fights (Level 112) and Right click option "Cannon" (must be loaded with a cannonball to use) |
| Mithril minotaur | 66 | 55 | 6.6 | Combat - Defence | Fights (Level 112) |
| War tortoise | 67 | 43 | 0.7 | Beast of Burden - 18 slots | Fights (Level 86 - Defence) |
| Bunyip | 68 | 44 | 1.4 | Healer - Heals owner for 20 Life Points every 15 seconds | Fights (Level 70 - Attack) and use raw fish on it to turn into water runes |
| Fruit bat | 69 | 45 | 1.4 | Forager - Fruit and seeds | Light enhancer and Fly - gathers fruit in Karamja |
| Ravenous locust | 70 | 24 | 1.5 | Combat - Attack | Fights (Level 120), can eat your opponent's food, and remote view |
| Arctic bear | 71 | 28 | 1.1 | Combat - Controlled | Fights (Level 122), Hunter boost (7), counts as two pieces of snow camo, and can teleport you to the Trollweiss and Rellekka Hunter area |
| Phoenix | 72 | 30 | 7 | Combat - Magic | Fights (Level 124) and Right click option "Ash Blast" (blinds opponents for a few seconds reducing their chance to hit). |
| Obsidian golem | 73 | 55 | 7.3 | Combat - Strength | Fights (Level 126) and Mining boost (7) |
| Granite lobster | 74 | 47 | 3.7 | Forager - Gathers fish while owner is Fishing | Fights (Level 129 - Defence) and Fishing boost (4) |
| Praying mantis | 75 | 69 | 3.7 | Combat - Attack | Fights (Level 131) |
| Adamant minotaur | 76 | 66 | 7.6 | Combat - Defence | Fights (Level 133) |
| Forge regent | 76 | 45 | 1.5 | Combat - Ranged | Fights (Level 133), counts as tinderbox (with 10 experience bonus), and Right click option "Fireball" (flaming attack that hits up to 6 enemies for 5 damage each) |
| Talon beast | 77 | 49 | 3.8 | Combat - Strength | Fights (Level 135) |
| Giant ent pouch | 78 | 49 | 1.6 | Combat - Controlled | Fights (Level 137), increased yield when harvesting Farming fruit trees, belladonna, and caci; Forager - produces oak logs, and Nature link - can convert pure essence into nature or earth runes |
| Fire titan | 79 | 62 | 7.9 | Combat - Magic | Fights (Level 139) |
| Ice titan | 79 | 64 | 7.9 | Combat - Attack | Fights (Level 139) |
| Moss titan | 79 | 58 | 7.9 | Combat - Strength | Fights (Level 139) |
| Hydra | 80 | 49 | 1.6 | Combat - Ranged | Fights (Level 141) |
| Nightmare muspah | 81 | 57 | 1.6 | Beast of Burden - 32 slots (Divination memories and energy only) | Siphon self - Extracts various tiers of energy from itself and adds them to its inventory |
| Spirit dagannoth | 83 | 57 | 4.1 | Combat - Controlled | Fights (Level 148) and Ferocious - chance of attacking again without a delay |
| Lava titan | 83 | 61 | 8.3 | Combat - Strength | Fights (Level 148), chance of 50 extra damage with every attack, Firemaking boost (10), Mining boost (10), and can teleport you to the Lava Maze |
| Swamp titan | 85 | 56 | 4.2 | Combat - Attack | Fights (Level 152) |
| Rune minotaur | 86 | 151 | 8.7 | Combat - Defence | Fights (Level 154) |
| Blood nihil | 87 | 90 | 8.7 | Combat - Melee | Fights (Level 160), Boosts Melee by 5% when wearing Melee equipment |
| Ice nihil | 87 | 90 | 8.7 | Combat - Magic | Fights (Level 160), Boosts Magic by 5% when wearing Magic equipment and drains target's defence and accuracy |
| Shadow nihil | 87 | 90 | 8.7 | Combat - Ranged | Fights (Level 160), Boosts Ranged by 5% when wearing Ranged equipment |
| Smoke nihil | 87 | 90 | 8.7 | Combat - Ranged | Fights (Level 160), Boosts Ranged by 5% when wearing Ranged equipment |
| Unicorn stallion | 88 | 54 | 1.8 | Healer - Use scroll | Fights (Level 70 - Controlled) and Right click option "Cure" (Cures poison and disease) |
| Light creature | 88 | 60 | 9 | Divination | Provides a 10% chance to automatically convert harvested memories without the use of a crater while training Divination. |
| Geyser titan | 89 | 69 | 8.9 | Combat - Ranged | Fights (Level 200), Ranged boost (1 + 3% of level), use bowls on it to get bowls of hot water, and use Amulet of glories on it to recharge them |
| Wolpertinger | 92 | 62 | 4.6 | Combat - Magic | Fights (Level 210), Hunter boost (5), grants 5% Defence bonus against Magic, and double experience and yield when harvesting berries |
| Abyssal titan | 93 | 32 | 1.9 | Beast of Burden - 20 slots for unnoted rune/pure essence | Fights (Level 215 - Attack) |
| Iron titan | 95 | 60 | 4.7 | Combat - Defence | Fights (Level 220) and Defence boost (10% bonus to stab, slash, and crush Defence) |
| Pack yak | 96 | 58 | 4.8 | Beast of Burden - 30 slots | Fights (Level 175 - Strength) |
| Steel titan | 99 | 64 | 4.9 | Combat - Ranged | Fights (Level 230) and Defence boost (15% bonus to stab, slash, and crush Defence) |
| Pack mammoth | 99 | 64 | 10 | Beast of Burden - 32 slots |
Next off we have the Summoning scrolls. These are used to release the Familiar's special ability. These are made by going to an obelisk with pouches, switching menu tabs, and choosing the correct scrolls symbol for the pouches you have.
Below is a table that shows what scroll is used for each Familiar and more information.
| Scroll Name | Scroll Image | Pouch Needed | Level Required | Ability | Points Used | Experience Gained When Activated |
| Howl |  |
Spirit wolf | 1 | Causes NPC opponents to flee from the battlefield | 3 | 0.1 |
| Dreadfowl Strike |  |
Dreadfowl | 4 | Magic attack that damages up to 30 | 3 | 0.1 |
| Egg Spawn |  |
Spirit spider | 10 | Spawns a random amount of red spider eggs | 6 | 0.2 |
| Slime Spray |  |
Thorny snail | 13 | Attack that damages up to 80 | 3 | 0.2 |
| Stony Shell |  |
Granite crab | 16 | Boosts your Defence by 4 | 12 | 0.2 |
| Pester |  |
Spirit mosquito | 17 | Commands mosquito to attack | 3 | 0.5 |
| Electric Lash |  |
Desert wyrm | 18 | Magic attack that does 50 damage and stuns your opponent | 12 | 0.2 |
| Venom Shot |  |
Spirit scorpion | 19 | Change of making a Range attack of yours be slightly poisonous, if the arrows can be poisoned in the first place | 6 | 1 |
| Fireball Assault |  |
Spirit Tz-Kih | 22 | Hits two nearby enemies up to 70 damage | 6 | 1.1 |
| Cheese Feast |  |
Albino rat | 23 | Stores 4 cheese in the rat's inventory | 6 | 2.3 |
| Sandstorm |  |
Spirit kalphite | 25 | Strikes up to 5 enemies for up to 20 damage | 6 | 2.5 |
| Generate compost |  |
Compost mound | 28 | Fills nearby compost bin with a chance of making supercompost | 12 | 0.6 |
| Explode |  |
Giant chinchompa | 29 | Detonates the chinchompa, damaging nearby enemies | 3 | 2.9 |
| Vampyre touch |  |
Vampyre bat | 31 | Damages up to 120 with a chance of restoring 20 of your own Life Points | 4 | 1.6 |
| Insane ferocity |  |
Honey badger | 32 | Reduces its Defence to increase its Attack and Strength | 12 | 1.6 |
| Multichop |  |
Beaver | 33 | Cuts up to 3 logs on a nearby tree | 3 | 0.7 |
| Call to arms |  |
Void familiars | 34 | Teleports you to Pest Control | 3 | 0.7 |
| Bronze bull rush |  |
Bronze minotaur | 36 | Magic attack that damages up to 40 with a chance of stun | 6 | 3.6 |
| Unburden |  |
Bull ant | 40 | Restores run energy based on your Agility level | 12 | 0.6 |
| Herbcall |  |
Macaw | 41 | Chance of making herbs | 12 | 0.8 |
| Evil flames |  |
Evil turnip | 42 | Magic attack that drains an opponent's Ranged skill | 6 | 2.1 |
| Petrifying gaze |  |
Spirit cockatrices and other variants | 43 | Deals up to 100 damage as well as reducing a combat skill (varies between types of Cockatrices) | 3 | 0.9 |
| Iron bull rush |  |
Iron minotaur | 46 | Magic attack that damages up to 60 with a chance of stun | 6 | 4.6 |
| Immense heat |  |
Pyrelord | 46 | Smelts a gold bar into an item of jewellery witout a furnace | 6 | 2.3 |
| Thieving fingers |  |
Magpie | 47 | +2 Thieving boost | 12 | 0.9 |
| Blood drain |  |
Bloated leech | 49 | Heals stat damage, poison, and disease at the cost of some Life Points | 6 | 2.5 |
| Tireless run |  |
Spirit terrorbird | 52 | +2 Agility boost and restores run energy based on your Agility level | 8 | 0.8 |
| Abyssal drain |  |
Abyssal parasite | 54 | Magic attack that gives you a Prayer point if it hits | 6 | 1.1 |
| Dissolve |  |
Spirit jelly | 55 | Magic attack that damages up to 120 and drains the opponent's Attack | 6 | 5.5 |
| Steel bull rush |  |
Steel minotaur | 56 | Magic attack that damages up to 90 with a chance of stun | 6 | 5.6 |
| Fish rain |  |
Ibis | 56 | Produces fish up to Bass | 12 | 1.1 |
| Goad |  |
Spirit graahk | 57 | Commands your graahk to attack | 3 | 5.7 |
| Ambush |  |
Spirit kyatt | 57 | Commands your kyatt to attack with an instant hit and potentially high damage | 3 | 5.7 |
| Rending |  |
Spirit larupia | 57 | Magic-based attack which also drains opponent's Strength | 6 | 5.7 |
| Doomsphere device |  |
Karamthulhu overlord | 58 | Damages up to 160 | 3 | 5.8 |
| Dust cloud |  |
Smoke devil | 61 | Damages up to 80 and up to 60 on nearby opponents | 6 | 3.1 |
| Abyssal stealth |  |
Abyssal lurker | 62 | +4 boost to Agility and Thieving | 20 | 1.9 |
| Ophidian incubation |  |
Spirit cobra | 63 | Transforms an egg into a Cockatrice egg | 3 | 3.2 |
| Poisonous blast |  |
Stranger plant | 64 | Attack with a 50% chance of poison and inflicting 2 damage | 6 | 3.2 |
| Mithril bull rush |  |
Mithril minotaur | 66 | Magic attack that damages up to 120 with a chance of stun | 6 | 6.6 |
| Toad bark |  |
Barker toad | 66 | Damages up to 180 | 6 | 1 |
| Testudo |  |
War tortoise | 67 | Boosts your Defence level by 8 | 20 | 0.7 |
| Swallow whole |  |
Bunyip | 68 | Allows you to eat uncooked fish if you have the level to cook it | 3 | 1.4 |
| Fruitfall |  |
Fruit bat | 69 | Produces random fruit nearby | 6 | 1.4 |
| Famine |  |
Ravenous locust | 70 | Destroys opponent's food | 12 | 1.5 |
| Arctic blast |  |
Arctic bear | 71 | Magic attack that damages up to 150 with a chance to stun | 6 | 1.1 |
| Rise from the ashes |  |
Phoenix and Reborn phoenix |
72 | Your opponent turns into ashes on the ground causing phoenix to be reborn, healing all of its health, and damaging nearby enemies. The lower the phoenix's heath before casting, the higher to the damage dealt to the nearby enemies | 8 | 5 |
| Volcanic strength |  |
Obsidian golem | 73 | Boosts your Strength by 9 | 12 | 7.3 |
| Crushing claw |  |
Granite lobster | 74 | Damages up to 140 as well as removing up to 5 Defence from opponent | 6 | 3.7 |
| Mantis strike |  |
Praying mantis | 75 | Binds, causes Magic-based damage, and drains player's Prayer points | 6 | 3.8 |
| Adamant bull rush |  |
Adamant minotaur | 76 | Magic attack that damages up to 160 with a chance of stun | 6 | 7.6 |
| Inferno |  |
Forge regent | 76 | Magic attack that can unequip your opponent's weapon or shield | 6 | 1.5 |
| Deadly claw |  |
Talon beast | 77 | Commands Talon beast to do 3 Magic attacks | 6 | 11.7 |
| Acorn missile |  |
Giant ent pouch | 78 | Damages up to 170 on up to 3 enemies and a chance of acorns being dropped | 6 | 1.6 |
| Titan's Constitution |  |
Fire, Ice, or Moss titan | 79 | Boosts Defence and Constitution greatly | 20 | 7.9 |
| Regrowth |  |
Hydra | 80 | Use on a Farming tree stump to instantly grow back | 6 | 1.6 |
| Siphon self |  |
Nightmare muspah | 81 | Extracts Elder, Incandescent, Luminous and Radiant Divination energy from the muspah and adds it to its inventory. | 20 | 2 |
| Ring of fire |  |
Brawler, Deacon, or Executioner demon | 82 | Deals damage to multiple nearby targets | 12 | 3.9 |
| Spike shot |  |
Spirit dagannoth | 83 | Range attack that damages up to 180 and stuns | 6 | 4.2 |
| Ebon thunder |  |
Lava titan | 83 | Magic attack that drains your opponent's Special Attack energy | 4 | 8.3 |
| Swamp plague |  |
Swamp titan | 85 | Area effect Magic that can poison your enemies | 6 | 4.3 |
| Rune bull rush |  |
Rune minotaur | 86 | Magic attack that damages up to 190 with a chance of stun | 6 | 8.6 |
| Annihilate |  |
Nihil | 87 | Damages your target and stuns them for a short time | 20 | 1.6 |
| Healing aura |  |
Unicorn stallion | 88 | Heals up to 15% of your Life Points | 20 | 1.8 |
| Enlightenment |  |
Light creature | 88 | Gives you an enlightened state for 6 minutes with the following effects:
|
20 | 1.6 |
| Boil |  |
Geyser titan | 89 | Damages a player, more depending on their armor | 6 | 8.9 |
| Magic focus |  |
Wolpertinger | 92 | Boosts your Magic level by 7 | 20 | 4.6 |
| Essence shipment |  |
Abyssal titan | 93 | Transports all pure essence from your inventory and titan's to your bank | 6 | 1.9 |
| Iron Within |  |
Iron titan | 95 | Iron titan's next attack will be three powerful melee attacks | 12 | 4.8 |
| Winter storage |  |
Pack yak | 96 | Use special on an item in your inventory to send it to your bank | 12 | 4.8 |
| Steel of Legends |  |
Steel titan | 99 | Steel titan's next attack will be four powerful Ranged attacks | 12 | 5 |
| Mammoth Feast |  |
Pack mammoth | 99 | Automatically uses food stored in the familiar, healing the player. | 20 | 10 |
Apart from Antlers, Lizard skull, and Feather headdress, there are other helmets that can hold your summoning scrolls. Pikkupstix will enchanted any of the helmets below into summoning helmet. Remember that once enchanted the helmet are untradable, Pikkupstix however has the ability to turn them back into regular helmets.
| Helmet | Image | Scroll capacity | Level required | Other requirements |
| Adamant full helm |  |
50 | 20 | 30 Defence |
| Slayer helmet |  |
50 | 20 | 10 Defence, and completed the Smoking Kills quest |
| Snakeskin bandana |  |
50 | 20 | 30 Defence, and 30 Ranged |
| Splitbark helm |  |
50 | 30 | 40 Defence, and 40 Magic |
| Rune full helm |  |
60 | 30 | 40 Defence |
| Warrior helm |  |
70 | 35 | 45 Defence, and completed The Fremmenik Trials quest |
| Berserker helm |  |
70 | 35 | 45 Defence, and completed The Fremmenik Trials quest |
| Archer helm |  |
70 | 35 | 45 Defence, and completed The Fremmenik Trials quest |
| Farseer helm |  |
70 | 35 | 45 Defence, and completed The Fremmenik Trials quest |
| Helm of neitiznot |  |
90 | 45 | 55 Defence, and completed The Fremennik Isles quest |
| Dragon helm |  |
110 | 50 | 60 Defence |
| Lunar helm |  |
110 | 55 | 40 Defence, 65 Magic, and completed the Lunar Diplomacy quest |
| Armadyl helmet |  |
120 | 60 | 70 Defence, and 70 Ranged |
The list below tells you what type of Cockatrice eggs are out there and how they can be obtained.
| Egg Name | Image | Where Found | Familiar Result |
| Cockatrice egg |  |
Monster drop or Spirit cobra special on an Egg | Spirit cockatrice |
| Guthatrice egg |  |
Spirit cobra special on a Green bird's egg | Spirit guthatrice |
| Zamatrice egg |  |
Spirit cobra special on a Red bird's egg | Spirit zamatrice |
| Spirit saratrice |  |
Spirit cobra special on a Blue bird's egg | Spirit saratrice |
| Pengatrice egg |  |
Spirit cobra special on a Penguin egg | Spirit pengatrice |
| Vulatrice egg |  |
Spirit cobra special on a Vulture egg | Spirit vulatrice |
| Coraxatrice egg |  |
Spirit cobra special on a Raven egg | Spirit coraxatrice |
| Pet Name | Image (Adult) | Level Required | Image (Baby/Egg) | Source | Notes | Time for Adult |
| Cat |  |
1 | |
Obtained from after completing the Gertrude's Cat. | The kitten will drink milk and eat both Raw and cooked fish until it's grown into a cat. | 150 min. |
| Bulldog |  |
4 |  |
Bought from Pet Shops for 500 gp | Eats raw meat (not fish) and takes bones | 400 min. |
| Dalmatian |  |
4 |  |
Bought from Pet Shops for 500 gp | Eats raw meat (not fish) and takes bones | 400 min. |
| Greyhound |  |
4 |  |
Bought from Pet Shops for 500 gp | Eats raw meat (not fish) and takes bones | 400 min. |
| Labrador |  |
4 |  |
Bought from Pet Shops for 500 gp | Eats raw meat (not fish) and takes bones | 400 min. |
| Sheepdog |  |
4 |  |
Bought from Pet Shops for 500 gp | Eats raw meat (not fish) and takes bones | 400 min. |
| Terrier |  |
4 |  |
Bought from Pet Shops for 500 gp | Eats raw meat (not fish) and takes bones | 400 min. |
| Abyssal minion |  |
4 | |
Reward from the Soul Wars mini-game | Eats ashes | N/A |
| Baby basilisk |  |
4 | |
Reward from the Soul Wars mini-game | Eats eye of newt | N/A |
| Baby kurask |  |
4 | |
Reward from the Soul Wars mini-game | Eats bones | N/A |
| Creeping hand |  |
4 | |
Reward from the Soul Wars mini-game | Eats leather gloves | N/A |
| Minitrice |  |
4 | |
Reward from the Soul Wars mini-game | Eats limpwurt root | N/A |
| Rune guardian |  |
4 | |
Reward from the Rune Mechanics quest | Needs to be revitalized at a runecrafting altar to feed it | N/A |
| Gecko |  |
10 | |
Caught using Hunter | Eats flies as a baby, eats flies and beetle bits as an adult | 400 min. |
| Platypus |  |
10 |  |
Caught using Hunter | Eats raw fish and ground fishing bait as a baby, eats raw fish and fishing bait when adult. You must have completed the As a First Resort... quest to be able to catch this | ? |
| Broav |  |
23 | |
Caught using Hunter | Eats Mort myre fungus. You must have completed the While Guthix Sleeps to be able to catch this | N/A |
| Penguin |  |
30 |  |
Egg obtained from the Penguin Zookeeper in Ardougne Zoo | Egg must be incubated at a Pet Shop and eats raw fish | 400 min. |
| Tooth Creature |  |
37 |  |
Bought from the Tooth Fairy in exchange for 5 teeth after the A Fairy Tale Part III - Battle at Orks Rift quest. | Eats regular milk. If you feed it Chocolatey milk, it will turn into a Decayed instead of a Healthy creature. | ? |
| Giant crab |  |
40 |  |
Obtained from trading Nung a Cunchy claw token for the Baby giant crab | Eats raw fish | 400 min. |
| Raven |  |
50 |  |
Egg obtained from Bird's nests | Egg must be incubated at a Pet Shop, eats ground fishing bait as chick, and normal fishing bait as adult | 400 min. |
| Squirrel |  |
60 |  |
Caught using Hunter | Eats nuts | 400 min. |
| Guthix raptor |  |
70 |  |
Egg obtained from Bird's nests | Egg must be incubated at a Pet Shop, eats ground fishing bait as chick, and normal fishing bait as adult | 1200 min. |
| Saradomin owl |  |
70 |  |
Egg obtained from Bird's nests | Egg must be incubated at a Pet Shop, eats ground fishing bait as chick, and normal fishing bait as adult | 1200 min. |
| Zamorak hawk |  |
70 |  |
Egg obtained from Bird's nests | Egg must be incubated at a Pet Shop, eats ground fishing bait as chick, and normal fishing bait as adult | 1200 min. |
| Ex-ex-parrot |  |
71 | |
Obtained by asking Bill Teach for a Magical cage. Then, you must speak with 50 Ships Mufasa to receive an Ex-parrot. Place the dead parrot in the cage and use the cage on the stone slab outside of the Cave Horror dungeon on Mos Le'Harmless. The bird will become an Ex-ex-parrot. | Eats Rock fragments. You must have completed the Rocking Out quest to be able to obtain this | N/A |
| Cute phoenix eggling |  |
72 | |
Egg from the Phoenix Lair Distractions and Diversions | Eats ashes. You must have completed the In Pyre Need quest to be able to obtain this. Upon leaving the lair, you will receive a Phoenix egg. Clap to hatch the egg | N/A |
| Mean phoenix eggling |  |
72 | |
Egg from the Phoenix Lair Distractions and Diversions | Eats ashes. You must have completed the In Pyre Need quest to be able to obtain this. Upon leaving the lair, you will receive a Phoenix egg. Kick the egg to hatch the egg | N/A |
| Raccoon |  |
80 |  |
Caught using Hunter | Eats raw meat and fish | 450 min. |
| Vulture |  |
85 |  |
Egg obtained from killing Vultures | Egg must be incubated at a Pet Shop, eats ground fishing bait as chick, and normal fishing bait as adult | ? |
| Chameleon |  |
90 |  |
Egg obtained on Cairn Isle | Egg must be incubated at a Pet Shop and eats flies | ? |
| Monkey |  |
95 |  |
Caught using Hunter | Eats bananas | ? |
| Dragon |  |
99 |  |
Egg obtained from killing Dragons | Egg must be incubated at a Pet Shop and eats vast quantities of raw meat, fish, or chicken | ? |
| TzRek-Jad |  |
99 | |
Obtained by talking to Nomad or Zimberfizz at the Soul Wars lobby. You must have 99 Slayer, 100 zeal points and a Fire cape to receive it from them | Does not get hungry | N/A |
Summoning has a great use inside the dungeons of Daemoheim. The higher your summoning level, the better the familiars you can summon. There are 6 different familiars, all with varying uses.
Bloodrager
The Bloodragers are the warrior familiars within Daemonheim. They require ores to summon, and their sundering strike can greatly reduce the defence of their opponent. These are popular in dungeons, especially at higher tiers, due to their fighting abilities.
| Summoning lv Required |
Tier | Name | Image | Image/Charm | Image/Item | Image/Scroll |
| 1 | 1 | Cub Bloodrager |  |
 Gold Charm |
 Novite Ore Novite Ore |
 Sundering Strike Sundering Strike |
| 11 | 2 | Little Bloodrager |  |
Gold Charm |
 Bathus Ore Bathus Ore |
 Sundering Strike Sundering Strike |
| 21 | 3 | Naive Bloodrager |  |
Gold Charm |
 Marmaros Ore Marmaros Ore |
 Sundering Strike Sundering Strike |
| 31 | 4 | Keen Bloodrager |  |
 Green Charm |
 Kratonite Ore Kratonite Ore |
 Sundering Strike Sundering Strike |
| 41 | 5 | Brave Bloodrager |  |
Green Charm |
 Fractite Ore Fractite Ore |
 Sundering Strike Sundering Strike |
| 51 | 6 | Brah Bloodrager |  |
Green Charm |
 Zephyrium Ore Zephyrium Ore |
 Sundering Strike Sundering Strike |
| 61 | 7 | Naabe Bloodrager |  |
 Crimson Charm |
 Argonite Ore Argonite Ore |
 Sundering Strike Sundering Strike |
| 71 | 8 | Wise Bloodrager |  |
Crimson Charm |
 Katagon Ore Katagon Ore |
 Sundering Strike Sundering Strike |
| 81 | 9 | Adept Bloodrager |  |
 Blue Charm |
 Gorgonite Ore Gorgonite Ore |
 Sundering Strike Sundering Strike |
| 91 | 10 | Sachem Bloodrager |  |
Blue Charm |
 Promethium Ore Promethium Ore |
 Sundering Strike Sundering Strike |
Deathslingers
The deathslingers are the ranging familiars in daemonheim. They require 2 logs to create the pouch. Their special attack scroll has an accurate, powerful shot that may poison the target.
| Summoning lv Required |
Tier | Name | Image | Image/Charm | Image/Item | Image/Scroll |
| 2 | 1 | Cub Deathslinger |  |
Gold Charm |
2  Tangle Gum branches Tangle Gum branches |
 Poisonous Shot Poisonous Shot |
| 12 | 2 | Little Deathslinger |  |
Gold Charm |
2  Seeping Elm branches Seeping Elm branches |
 Poisonous Shot Poisonous Shot |
| 22 | 3 | Naive Deathslinger |  |
Gold Charm |
2  Blood Spindle branches Blood Spindle branches |
 Poisonous Shot Poisonous Shot |
| 32 | 4 | Keen Deathslinger |  |
Green Charm |
2  Utuku branches Utuku branches |
 Poisonous Shot Poisonous Shot |
| 42 | 5 | Brave Deathslinger |  |
Green Charm |
2  Spinebeam branches Spinebeam branches |
 Poisonous Shot Poisonous Shot |
| 52 | 6 | Brah Deathslinger |  |
Green Charm |
2  Bovistrangler branches Bovistrangler branches |
 Poisonous Shot Poisonous Shot |
| 62 | 7 | Naabe Deathslinger |  |
Crimson Charm |
2  Thigat branches Thigat branches |
 Poisonous Shot Poisonous Shot |
| 72 | 8 | Wise Deathslinger |  |
Crimson Charm |
2  Corpsethorn branches Corpsethorn branches |
 Poisonous Shot Poisonous Shot |
| 82 | 9 | Adept Deathslinger |  |
Blue Charm |
2  Entgallow branches Entgallow branches |
 Poisonous Shot Poisonous Shot |
| 92 | 10 | Sachem Deathslinger |  |
Blue Charm |
2  Gravecreeper branches Gravecreeper branches |
 Poisonous Shot Poisonous Shot |
Stormbringers
Stormbringers are the mage familiars within Daemonheim. They require a plant to summon, and their snaring wave special attack makes a more damaging, accurate attack that immobilises the opponent in place.
| Summoning lv Required |
Tier | Name | Image | Image/Charm | Image/Item | Image/Scroll |
| 3 | 1 | Cub Stormbringer |  |
Gold Charm |
 Salve nettles Salve nettles |
 Snaring Wave Snaring Wave |
| 13 | 2 | Little Stormbringer |  |
Gold Charm |
 Wildercress Wildercress |
 Snaring Wave Snaring Wave |
| 23 | 3 | Naive Stormbringer |  |
Gold Charm |
 Blightleaf Blightleaf |
 Snaring Wave Snaring Wave |
| 33 | 4 | Keen Stormbringer |  |
Green Charm |
 Roseblood Roseblood |
 Snaring Wave Snaring Wave |
| 43 | 5 | Brave Stormbringer |  |
Green Charm |
 Bryll Bryll |
 Snaring Wave Snaring Wave |
| 53 | 6 | Brah Stormbringer |  |
Green Charm |
 Duskweed Duskweed |
 Snaring Wave Snaring Wave |
| 63 | 7 | Naabe Stormbringer |  |
Crimson Charm |
 Soulbell Soulbell |
 Snaring Wave Snaring Wave |
| 73 | 8 | Wise Stormbringer |  |
Crimson Charm |
 Ectograss Ectograss |
 Snaring Wave Snaring Wave |
| 83 | 9 | Adept Stormbringer |  |
Blue Charm |
 Runeleaf Runeleaf |
 Snaring Wave Snaring Wave |
| 93 | 10 | Sachem Stormbringer |  |
Blue Charm |
 Spiritbloom Spiritbloom |
 Snaring Wave Snaring Wave |
Hoardstalker
Hoardstalkers are used rarely in dungeoneering, but they can be useful. For the duration they are summoned, they will forage for raw items, such as ore, logs, or raw fish, up to their tier level. Their Aptitude scroll will raise your skill level by an amount equal to their tier, but you have no control over which skill it boosts.
| Summoning lv Required |
Tier | Name | Image | Image/Charm | Image/Item | Image/Scroll |
| 5 | 1 | Cub Hoardstalker |  |
Gold Charm |
 Protomastyx Hide Protomastyx Hide |
 Aptitude Aptitude |
| 15 | 2 | Little Hoardstalker |  |
Gold Charm |
 Submastyx hide Submastyx hide |
 Aptitude Aptitude |
| 25 | 3 | Naive Hoardstalker |  |
Gold Charm |
 Paramastyx hide Paramastyx hide |
 Aptitude Aptitude |
| 35 | 4 | Keen Hoardstalker |  |
Green Charm |
 Archaemastyx hide Archaemastyx hide |
 Aptitude Aptitude |
| 45 | 5 | Brave Hoardstalker |  |
Green Charm |
 Dromomastyx hide Dromomastyx hide |
 Aptitude Aptitude |
| 55 | 6 | Brah Hoardstalker |  |
Green Charm |
 Spinomastyx hide Spinomastyx hide |
 Aptitude Aptitude |
| 65 | 7 | Naabe Hoardstalker |  |
Crimson Charm |
 Gallimastyx hide Gallimastyx hide |
 Aptitude Aptitude |
| 75 | 8 | Wise Hoardstalker |  |
Crimson Charm |
 Stegomastyx hide Stegomastyx hide |
 Aptitude Aptitude |
| 85 | 9 | Adept Hoardstalker |  |
Blue Charm |
 Megamastyx hide Megamastyx hide |
 Aptitude Aptitude |
| 95 | 10 | Sachem Hoardstalker |  |
Blue Charm |
 Tyrannomastyx hide Tyrannomastyx hide |
 Aptitude Aptitude |
Worldbearers
The worldbearers are the beast of burden familiars inside the dungeons of Daemonheim. They can hold from 12-30 items, depending on their tier. Their Second wind scroll restores some of your run energy for you.
| Summoning lv Required |
Tier | Name | Image | Image/Charm | Image/Item | Image/Scroll |
| 7 | 1 | Cub Worldbearer |  |
Gold Charm |
 Protoleather torn bag Protoleather torn bag |
 Second Wind Second Wind |
| 17 | 2 | Little Worldbearer |  |
Gold Charm |
 Subleather torn bag Subleather torn bag |
 Second Wind Second Wind |
| 27 | 3 | Naive Worldbearer |  |
Gold Charm |
 Paraleather torn bag Paraleather torn bag |
 Second Wind Second Wind |
| 37 | 4 | Keen Worldbearer |  |
Green Charm |
 Archleather torn bag Archleather torn bag |
 Second Wind Second Wind |
| 47 | 5 | Brave Worldbearer |  |
Green Charm |
 Dromoleather torn bag Dromoleather torn bag |
 Second Wind Second Wind |
| 57 | 6 | Brah Worldbearer |  |
Green Charm |
 Spinoleather torn bag Spinoleather torn bag |
 Second Wind Second Wind |
| 67 | 7 | Naabe Worldbearer |  |
Crimson Charm |
 Gallileather torn bag Gallileather torn bag |
 Second Wind Second Wind |
| 77 | 8 | Wise Worldbearer |  |
Crimson Charm |
 Stegoleather torn bag Stegoleather torn bag |
 Second Wind Second Wind |
| 87 | 9 | Adept Worldbearer |  |
Blue Charm |
 Megaleather torn bag Megaleather torn bag |
 Second Wind Second Wind |
| 97 | 10 | Sachem Worldbearer |  |
Blue Charm |
 Tyrannoleather torn bag Tyrannoleather torn bag |
 Second Wind Second Wind |
Skinweavers
The Skinweavers are very useful familiars, as their primary ability is to add lifepoint regeneration onto any food you eat, ranging from 10-30lp. They require 2 pieces of food to summon. Its Glimmer of Light scroll can also heal you.
| Summoning lv Required |
Tier | Name | Image | Image/Charm | Image/Item | Image/Scroll |
| 9 | 1 | Cub Skinweaver |  |
Gold Charm |
 2 Heim Crab 2 Heim Crab |
 Glimmer of Light Glimmer of Light |
| 19 | 2 | Little Skinweaver |  |
Gold Charm |
 2 Red-Eye 2 Red-Eye |
 Glimmer of Light Glimmer of Light |
| 29 | 3 | Naive Skinweaver |  |
Gold Charm |
 2 Dusk Eel 2 Dusk Eel |
 Glimmer of Light Glimmer of Light |
| 39 | 4 | Keen Skinweaver |  |
Green Charm |
 2 Giant Flatfish 2 Giant Flatfish |
 Glimmer of Light Glimmer of Light |
| 49 | 5 | Brave Skinweaver |  |
Green Charm |
 2 Short-finned Eel 2 Short-finned Eel |
 Glimmer of Light Glimmer of Light |
| 59 | 6 | Brah Skinweaver |  |
Green Charm |
 2 Web Snipper 2 Web Snipper |
 Glimmer of Light Glimmer of Light |
| 69 | 7 | Naabe Skinweaver |  |
Crimson Charm |
 2 Bouldabass 2 Bouldabass |
 Glimmer of Light Glimmer of Light |
| 79 | 8 | Wise Skinweaver |  |
Crimson Charm |
 2 Salve Eel 2 Salve Eel |
 Glimmer of Light Glimmer of Light |
| 89 | 9 | Adept Skinweaver |  |
Blue Charm |
 2 Blue Crab 2 Blue Crab |
 Glimmer of Light Glimmer of Light |
| 99 | 10 | Sachem Skinweaver |  |
Blue Charm |
 2 Cave Moray 2 Cave Moray |
 Glimmer of Light Glimmer of Light |
Now, you ask, what is the best way to train this skill quickly? As you may already know, in the lower levels the only thing that gives decent experience is making the pouches. In this section we will discuss which way one should train in order to get the levels effectively.
This is perhaps the most annoying part of summoning: getting the charms. Monsters which drop these usually do not drop them in bunches (only few do), and it isn't a 100% drop. However, there are lots of monsters which drop these, from low level to high level ones! The difference between high and low level monsters is that the high level monsters have a higher charm dropping rate and they are also known to drop higher level charms more often. It may even appear that a monster which is hard to beat drops multiple charms at once!
There are four types of charms: gold, green, crimson and blue. The gold charm is the most common drop, and it requires the lowest level to use. Charms can also be bought with Zeal points obtained from the Soul Wars minigame and are rewards from Random events.
The table below should give common dropper of the charms. Please note however that if we were to list all monsters which drop charms, it'd take ages for your browser to load all data! That's why we have selected a few monsters which have a considerable drop rate. For all monsters which drop charms, please check out the charms in the items database. It may be useful to know that some, or all, are located in the Chaos Tunnels.
| Charm Name | Common Droppers |
| Gold charm | Abberant spectre, Ankou (all levels), Dagannoth (all levels), Fire Giant, Giant Rock Crab (10), Hellhound, Ice giant, Ice Warrior, Infernal Mage, Jogre, Giant bat,Moss giant, Ogre, Rock Crab, and Turoths (all levels) |
| Green charm | Basilisk, Black dragon, Bloodveld, Bronze dragon, Dagannoth (all levels), Giant Rock Crab (10), Green Dragon, Jelly, Jogre, Kurask, Metal Dragons (all), Turoth (all levels), Wild dog, and Wolf (all levels) |
| Crimson charm | Abyssal demon Cockroach soldier, Dagannoth (all levels), Dust Devil, Earth Warrior, Gargoyle, Giant Rock Crab (10), Greater Demon, Metal Dragons (all), Nechryael, Pyrefiend, Rock Lobster, Shadow Warrior, and Waterfiend |
| Blue charm | Black dragon, Dark Beasts, Gargoyle, Giant Rock Crab (10), Green Dragon, Kalphite soldier, Metal Dragons (all), Mummy, and Tormented Wraiths |
| Abyssal charm | Abyssal guardian, Abyssal leech, and Abyssal walker |
| Obsidian charm | TzHaar creatures |
Seeing as making pouches is the only decent way to gain experience, it is best you read through this part carefully. To make a summoning pouch, you will need an empty pouch, a charm (higher level pouches require higher charms), a certain amount of spirit shards (this varies per creature) and an item relevant to the creature you want to summon. You can buy the empty pouches from Pikkupstix for 1 gp each and you can buy the spirit shards from Pikkupstix for 25 gp each. The charms are monster drops. In the start you are given a certain amount of gold charms which should be able to get you up to at least level 16 Summoning. After this you will have to kill monsters for these charms. Higher level monsters drop higher level charms, so make sure to go on a killing spree! The relative item varies per monster. Some are easier to get than others.
Spirit gems are items that are dropped by monsters that also drop charms, the gems are worn in the pocket slot and have a chance to save a charm when making pouches. This charm saving can only happen so many times before the gem will be destroyed. The better the quality of the gem the higher the change and higher the charges it will have.
| Image | Name | Chance To Save |
Charges |
 |
Spirit sapphire | 10% | 10 |
 |
Spirit emerald | 20% | 20 |
 |
Spirit ruby | 30% | 30 |
 |
Spirit diamond | 40% | 40 |
 |
Spirit dragonstone | 50% | 50 |
 |
Spirit onyx | 60% | 60 |
Bogrog and Lord Amlodd's Exchange
At level 21 Summoning you can talk to Bogrog outside Gu'Tanoth to start exchanging pouches for 70% of the Spirit shards used to make the pouch and 10 scrolls for 30% of the Spirit shards used to make the pouch the scrolls are made from.
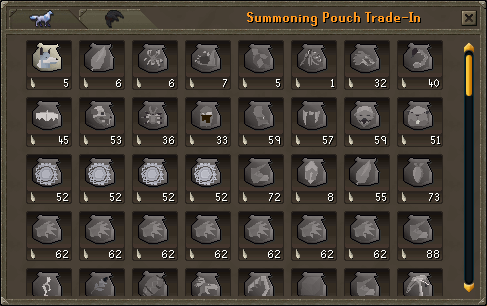
In addition to this you must have a Summoning level above the level required to infuse the pouch which you wish to swap. If you want to know the exact level required to swap a certain pouch, select the "Value" option on the pouch whilst talking to Bogrog.
If you have completed Plague's End, Lord Amlodd will provide the same service as Bogrog and will give you an additional 10% Spirit shards if you have also completed the Hard Tirannwn Tasks.
Below you will find a few recommended routes to obelisks you may use to comfortably make your pouches. For a list of all obelisks in case these pathways do not suit you, please visit the Obelisks/Shops part of the guide to view images of where they are located.
Making pouches through Taverley is one of the most efficient ways to train your Summoning level.
Via Taverley Bank
- Requirements: None.
- Bring: As many empty pouches as you have (they are stackable), as many spirit shards as you have (they are stackable), as many charms of the material you need as you have (they are stackable), boots of lightness (optional), spotted/spottier cape (optional) and penance gloves (optional). The last three items reduce weight, which allows you to run longer. Fill the rest of your inventory with the relative item you need for the creature.
- Route: From the Taverley bank (south of the lodestone) run east across the bridge, then slightly north to find Pikkupstix's house. Inside you'll see the summoning obelisk to create your pouches. Run south, then east across the bridge, back to the bank. Deposit your Summoning pouches, withdraw your relative items and repeat!
Via Hot-Air Balloon
- Requirements: Enlightened Journey quest, level 50 Firemaking, need to have unlocked the Castle Wars balloon.
- Bring: As many empty pouches as you have (they are stackable), as many spirit shards as you have (they are stackable), as many charms of the material you need as you have (they are stackable), ring of duelling, normal log, boots of lightness (optional), spotted/spottier cape (optional) and penance gloves (optional). The last three items reduce weight, which allows you to run longer. Fill the rest of your inventory with the relative item you need for the creature.
- Route: From Castle Wars, go outside and then north. Travel to Taverley by hot air balloon, then continue north until you get to Pikkupstix's house. Once there, go down the ladder and create the pouch you wish you use. Teleport back to Castle Wars, deposit your Summoning pouches, withdraw your willow log and relative items and repeat! Make sure you replace your ring of dueling when it breaks!
Via Player Owned House (POH)
- Requirements: House in Taverley, Glory Amulet in Skill Hall or Portal Room in your house (optional), Ancient magiks unlocked (optional), Canifis Portal (optional).
- Bring: As many empty pouches as you have (they are stackable), as many spirit shards as you have (they are stackable), as many charms of the material you need as you have (they are stackable), House Teleport Runes/Tablet (1 Law, 1 Earth, 1 Air), Ring of duelling (optional), boots of lightness (optional), spotted/spottier cape (optional) and penance gloves (optional). The last three items reduce weight, which allows you to run longer. Fill the rest of your inventory with the relative item you need for the creature.
- Route: First teleport to your house, go outside and head east. Once there, go down the ladder and create the pouch you wish you use. Now there are three methods of getting to a bank.
- Method 1: Glory Amulet - Once finished crafting pouches, return to your house, and then go to your skill hall. Teleport to Edgeville, bank, restock on materials and then teleport back to your house.
- Method 2: Teleport Room (Canifis) - Once finished crafting pouches, return to your house, and then go to your portal room. Use the portal to Canifis, bank, restock on materials and then teleport back to your house.
- Method 3: Ring of dueling - Once finished crafting pouches, use your ring of dueling to teleport to Castle Wars. Bank, restock on materials and then teleport back to your house. Make sure you replace your ring of dueling when it breaks!
Via Games Necklace
- Requirements: None.
- Bring: As many empty pouches as you have (they are stackable), as many spirit shards as you have (they are stackable), as many charms of the material you need as you have (they are stackable), boots of lightness (optional), spotted/spottier cape (optional), and penance gloves (optional). The last three items reduce weight, which allows you to run longer. Fill the rest of your inventory with the relative item you need for the creature.
- Route: Use your Games necklace to teleport to the Games Room area and head out towards the Rogue's Den or Warriors' Guild. There, access your bank account and grab all your supplies and head south towards Pikkupstix's house. Repeat this process by teleporting to the Games Room.
There is yet another effective way to make pouches, which is fairly easier to use than the Taverley method. You must have completed the Swan Song quest to enter the Piscatoris Fishing Colony and use their bank. You must have completed A Fairy Tale Part II - Cure a Queen quest to use the quick route to Piscatoris itself. Please keep in mind, there are no Summoning Shops in this area, so if you run out of shards, you will have to visit a shop for more supplies
Via Fairy Rings
- Requirements: Completed A Fairy Tale II and wielding a Lunar staff or Dramen staff.
- Bring: As many empty pouches as you have (they are stackable), as many spirit shards as you have (they are stackable), as many charms of the material you need as you have (they are stackable), boots of lightness (optional), spotted/spottier cape (optional), and penance gloves (optional). The last three items reduce weight, which allows you to run longer. Fill the rest of your inventory with the relative item you need for the creature.
- Route: While in Zanaris, head over to the main Fairy Ring and insert the code AKQ to go straight towards Piscatoris. When you're on Piscatoris, head a little north-east until you reach a trapdoor. Open it and head inside. Continue this path to make your pouches because it's relatively fast if you can put in the code fast and bank fast.
Via Piscatoris Fishing Colony Bank
- Requirements: Completed Swan Song.
- Bring: As many empty pouches as you have (they are stackable), as many spirit shards as you have (they are stackable), as many charms of the material you need as you have (they are stackable), boots of lightness (optional), spotted/spottier cape (optional), and penance gloves (optional). The last three items reduce weight, which allows you to run longer. Fill the rest of your inventory with the relative item you need for the creature.
- Route: When you are done banking in the bank, go out of the city and go through the underground tunnels until you reach the outside world of Piscatoris. When you're out, head west until you reach the trapdoor and open and go down. Make your pouches and head back to the bank and repeat as many times needed. This is the fastest way to make pouches and requires little things to do it.
Via Spirit Kyatt
- Requirements: 57 Summoning.
- Bring: As many empty pouches as you have (they are stackable), as many spirit shards as you have (they are stackable), as many charms of the material you need as you have (they are stackable), boots of lightness (optional), spotted/spottier cape (optional), and penance gloves (optional). The last three items reduce weight, which allows you to run longer. Also bring a Ring of duelling and a summoned Spirit Kyatt. Fill the rest of your inventory with the relative item you need for the creature.
- Route: Bank at Castle wars, then interact with your Spirit Kyatt and select teleport. This teleports you just south of the obelisk. Run north, go down the ladder, make your pouches. Afterwards, use your Ring of duelling to teleport back to Castle wars. Repeat as many times as you need to.
Via Ardougne Boat
- Requirements: None.
- Bring: 50-60k gp and as many empty pouches as you have (they are stackable), as many spirit shards as you have (they are stackable), as many charms of the material you need as you have (they are stackable), boots of lightness (optional), spotted/spottier cape (optional), and penance gloves (optional). The last three items reduce weight, which allows you to run longer. Fill the rest of your inventory with the relative item you need for the creature.
- Route: When you are done banking in East Ardougne, head over to the docks and take a trip over to Brimhaven. When you're on Brimhaven, head towards the House Portal and head West and follow the banks of the ocean to get to there. Refer to the Obelisk Locations Section of the guide to see exactly where it is. When your done teleport to Ardougne and continue. This method is NOT advised due to the fact it's long travels and you use a massive amount of runes in the process.
Via Player Owned House (POH)
- Requirements: Own a house in Brimhaven (40 Construction).
- Bring: Glory amulet charged and as many empty pouches as you have (they are stackable), as many spirit shards as you have (they are stackable), as many charms of the material you need as you have (they are stackable), boots of lightness (optional), spotted/spottier cape (optional), and penance gloves (optional). The last three items reduce weight, which allows you to run longer. Fill the rest of your inventory with the relative item you need for the creature.
- Route: Teleport to Edgeville using your glory and grab either the runes needed for your house teleport or a tele-tab and grab your ingredients and such for the pouches. Teleport to your house and head wWest and along the banks of the ocean until you reach there. Refer to the Obelisk Locations Section of the guide to see exactly where it is. Repeat this process by teleporting to Edgeville and continuing from there. Also, this method is still not advised due to the time it takes and amount of running needed.
- Requirements: None.
- Bring: As many empty pouches as you have (they are stackable), as many spirit shards as you have (they are stackable), as many charms of the material you need as you have (they are stackable), boots of lightness (optional), spotted/spottier cape (optional), and penance gloves (optional). The last three items reduce weight, which allows you to run longer. Fill the rest of your inventory with the relative item you need for the creature. Brining Watchtower teleport runes or tablets is also recommended.
- Route: When you are done banking in the Yanille bank, leave the city through its western entrance. Once outside, go south east to the Gu'tanoth path. Follow the path northwards until you come to a small summoning hut with the obelisk. Teleport or run back to Yanille using the same route and repeat this proces. Alternatively, you can use a Mithril grapple (requires 21 Range, 39 Agility, 38 Strength to us) to leave and access Yanille via the Agility shortcut in the southern city wall, if you do not have the requirements for the Watchtower teleport spell.
Question: Are the charms tradable?
Answer: No, they are not.
Question: Which is more important, the scroll or the pouch?
Answer: The pouch is the most important. The reason being is because when you make scrolls yourself, each pouch makes 10 scrolls and the scrolls cost less than pouches.
Question: Are Summoning pouches/scrolls tradable?
Answer: Yes, they are.
Question: How would I obtain the Void charms?
Answer: You must complete rounds in the Pest Control mini-game to gain points to buy void charms for 2 points each.
Question: Is there a potion for Summoning?
Answer: Yes, a Summoning potion will recharge your Summoning points by 7 - 31 points, depending on your Summoning level (similar to Prayer potions). A Herblore level of 40, Clean spirit weed and a Cockatrice egg (any kind).
Temporary level boosts and Quest rewards
For more information on how to boost your level, see the Temporary Stat Leveling Techniques special report.
For XP rewards from quests, see the Quest Experience Guide special report.

Once you have achieved level 99, you may visit Pikkupstix to purchase a Summoning cape for 99,000 Coins.

Once you have achieved level 120, Pikkupstix will sell you the Summoning master cape for 120,000 Coins.
Discount
Note that as of December 2018, another one of Mod Daze's Easter Eggs have been found. This enables you to purchase a Skillcape for half price (only from Pikkupstix, not Elen) if you are wearing a Ring of Charos (a). Be aware that "Half price" is 92,000 Coins as the experience at level 92 is approximately half way to level 99.
This Skill Guide was written by Terr002, niekjepiek, Jakesterwars, Harkalino, Xander_7, and Alfawarlord. Thanks to Job_is_God, Arkayla, Rokern, Devildog, Choramizzu1, Jett_Man, Serty456, NuclearMan, Skidryn, jontyshankys, Gonza211, DRAVAN, Sheep01, Draggy, Iriel_Red, pipedreamer, Angrymaster, Trigonseven, tweedgnomish, Debateman3, Kassandra, Sundista, Fire Goblin4, Morgan_and_Garrison, Bladekill133, Komnodragon1, Monado, Jaapie23, drmars, Spike31x, Omega, Thehi, Radmite, Master_Of_Stuff, Sccrluk9, Skeletonmat, Siegflare, Bladerman970, gabe0002, x_timowns_x, PKER2408, Tinychris1, Mega_Gamer05, Sanru, Darkblitz, diamondi3ack, theman200005, dragoon889, Zfreak23, Sire_TRM, Hilwin1, Draconic, spiderdude10, pieceofcake8, pucas37, nickstud, Egekalaycan, Omega, Jasper, Javezz, Parsonsda, Jarkur, Noble K, A2 304, Ksb Single, and ChathMurrpau for corrections.
This Skill Guide was entered into the database on Tue, Jan 22, 2008, at 06:22:38 PM by sheep01, and it was last updated on Fri, Aug 30, 2019, at 01:37:12 AM by KsbSingle.
If you see this guide on any other site, please report it to us so we can take legal action against anyone found stealing our content. This guide is copyrighted by RuneHQ, and its use on other sites is expressly forbidden. Do not ask if you can use our guides or images, the answer is and always will be NO!
Print this page with images - Back to the Skill Guide Index Page - Back to Top